Showing posts with label HTML Tutorial. Show all posts

Saturday, February 26, 2011

Making HTML Work

This concludes your learning of HTML. I have described almost all the important tags and attributes. It should set enough confidence in you to start designing your pages and sites. Remember, the secret to make everything work together is to ... PRACTICE... PRACTICE ... PRACTICE...
Test your code in both Internet Explorer and Netscape and don't use a WYSIWYG editor if you want to master HTML.
Here is you badge for successfully completing this tutorial.

Badge for successfully completeing Advanced HTML tutorial at www.webdevelopersnotes.com

HTML Meta tags - Keyword - Refresh - Redirect

Meta tags are generally used to include information about a document such as author name, creation date, copyright information etc. They always placed between the <HEAD> tags of an HTML document.
Each Meta tag has two important attributes:
  • HTTP-EQUIV or NAME
  • CONTENT
<META HTTP-EQUIV="some_name" CONTENT="some_content">

OR

<META NAME="some_name" CONTENT="some_content">

<META HTTP-EQUIV>

The HTTP-EQUIV attribute takes one of the values mentioned below:
  • CONTENT-TYPE: The most commonly used content type is text/html. Other types can be employed to include the character set for the document. This helps the browser to load the appropriate character before document display.
  • EXPIRES: Specifies the date and time after which a document should be considered expired. This can be used by web robots update content in a search engine.
  • CACHE-CONTROL: Determines the caching of the document.
  • CONTENT-LANGUAGE: Used to specify the language in which the document is written.
  • REFRESH: This value is commonly used to either redirect users to a different page or refresh the contents of the present page.
<META HTTP-EQUIV="CONTENT-TYPE" CONTENT="text/html">
<META HTTP-EQUIV="EXPIRES" CONTENT="May 1, 2002 00:00:00 EST">
<META HTTP-EQUIV="CACHE-CONTROL" CONTENT="no-cache">
<META HTTP-EQUIV="CONTENT-LANGUAGE" CONTENT="hi">
<META HTTP-EQUIV="REFRESH" CONTENT="5">
Note that all the META tags with HTTP-EQUIV attributes also contain the CONTENT attribute.
The HTTP-EQUIV="REFRESH" demands more attention here, so let us have a detailed look at it.
The tag above simply refreshes the contents of the page in 5 seconds. However, you can supply a URL to this tag, which redirects users to that page.
<META HTTP-EQUIV="REFRESH" CONTENT="2; URL=new.html">
This takes the user to new.html after 2 seconds.
Note that there is only one set of quotes that encloses the content of CONTENT. Both the time in seconds and the URL are inside the same quotes.
A cheap trick is to construct a looping (or non-looping) slide show making use of these tags. Let's say you have three html pages named slide1.html, slide2.html and slide3.html. You can make a looping slide show by including the appropriate META tag in each document.
slide1.html contains
<META HTTP-EQUIV="REFRESH" CONTENT="10; URL=slide2.html">

slide2.html contains
<META HTTP-EQUIV="REFRESH" CONTENT="10; URL=slide3.html">

slide3.html contains
<META HTTP-EQUIV="REFRESH" CONTENT="10; URL=slide1.html">
To start the slide-show, load slide1.html in the browser. After 10 seconds, slide1.html is replaced by slide2.html, which is again replaced by slide3.html after 10 seconds. Finally, after another 10 seconds, slide1.html replaces slide3.html and thus, the slide-show keeps on looping. Note that the <META> tag is placed in the head section of each document.

<META NAME>

Though there are some fixed values for the NAME attribute, you can construct your own meta tags with it. Let's look at the important values
  • KEYWORDS: You can supply keywords for your pages using this. It helps in indexing by search engines. Takes a list of comma separated keywords.
  • COPYRIGHT: Contains copyright information
  • DESCRIPTION: lets you specify a description of the page.
  • AUTHOR: You can write your name here.
  • ROBOTS: This tag is used to stop your pages from being indexed by robots. Its an alternative to the robots.txt file.
<META NAME="KEYWORDS" CONTENT="movies, hollywood, actors">
<META NAME="COPYRIGHT" CONTENT="2001, Some_Company_Name">
<META NAME="DESCRIPTION" CONTENT="Information on the greatest 
movies ever">
<META NAME="AUTHOR" CONTENT="your_name">
<META NAME="ROBOTS" CONTENT="NOINDEX, NOFOLLOW">

Image Maps part 2

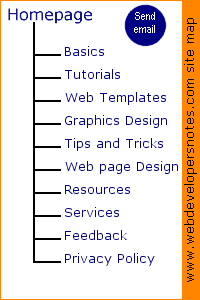
Here is how an image map works. Move your mouse cursor over the image below and check the links in your browser's status bar.
WebDevelopersNotes.com sitemap

Some important points to remember when designing Image Maps

  • The image used as a map should be large enough so that the users' cursor is not confined in a small place with lots of links.
  • It is recommended that the <MAP> tag along with its <AREA>s is placed at the end of the HTML document.
  • Use client-side maps unless most of your audience is using older browsers that support only server-side maps. There are many benefits in using the map on the client, especially performance.

Image Maps part 1

You know that an image can be made into a hot spot by enclosing it inside anchor tags. Such images point to only one HTML document, the one specified in the HREF attribute of the enclosing <A> tag. Thus,
<A HREF="http://www.webdevelopersnotes.com/">
<IMG SRC="home.gif" WIDTH="152" HEIGHT="25" 
ALT="Back to homepage" BORDER="0"></A>

Back to homepage Provides a link to homepage of this site.
Image maps too, carry links to documents. However, in Image Maps, different parts of the image are linked to different HTML documents! For example, the top part of the image might link to document1.html, the middle part to document2.html and the bottom to document3.html.
Linking different parts of an image to different documents/files is achieved through some specific HTML tags.
But before all that, let us get to know these image maps better.
Image Maps come in two flavors:
  • Server-side maps: Those that contain the linking information on the server.
  • Client-side maps: The linking information is bundled along with the HTML document.
There is always a performance benefit when using Client-side maps. They can also be made interactive using JavaScript. Since, client-side maps are supported by all modern browsers and are simpler to understand and implement than server-side maps, I shall be concentrating only on them.
[Though, the usage of older browsers has dwindled, it is recommended that you have a look at your site statistics to make a decision whether to use server-side maps, client-side maps or both.]

Client-side Image Maps

In order to use an image as a map, you have to include the USEMAP attribute inside the <IMG> tag. Thus, any image can be made into a map if the USEMAP attribute is added to the <IMG> tag. The value of this attribute is the name of the <MAP> element. The <MAP> element contains the main information about the image map. It defines the different areas of the image and their associated links.
The different regions of the image are defined using the <AREA> tags. These tags are placed between <MAP> - </MAP> tags. The link data is also specified by the <AREA> tags.
Your document can carry as many image-maps as you want, but each should have different maps to tell them apart.
Let's look at some code.
<IMG SRC="sitemap.gif" WIDTH="200" HEIGHT="300" BORDER="0" 
USEMAP="#site">
The SRC attribute of <IMG> tag specifies sitemap.gif to be used as an image map. The USEMAP attribute points to the map we shall be using.
Note: The name of the map is prefixed with a hash # sign.
It's simple, isn't it? Now we shall look at the <MAP> tag and the <AREA> tags it encloses.

<MAP>...</MAP>

This element has many attributes. Most of them are useful for scripting and for applying styles. We shall concern ourselves with only one, the NAME attribute. This attribute determines the name of the map and is used to refer to it from USEMAP attribute of the <IMG> tag. We'll name our map, site.
<MAP NAME="site">
...
Content
...
</MAP>

<AREA> tags and attributes

The main content of the image map resides inside <AREA> tags. Their important attributes are:
  • HREF: Takes a URL as value and provides a link to that document.
  • SHAPE: The values for this attribute can be RECT, CIRCLE, POLY or DEFAULT. These define the shape of the area in the main image. After dividing your image into RECTs, POLYs, and CIRCLEs, you might be left with some area. You can use the DEFAULT value to refer to this area.
  • COORDS: Takes a comma-separated list of values. Depending upon the shape, this value changes.
  • TARGET: Specifies the window in which to load the document. This attribute is the same as that for <A>.
  • NOHREF: This is employed when you do not want areas to be linked to any documents. Used often with the DEFAULT value of SHAPE mentioned above.
  • NAME: This defines an area that can be used for scripting, by older browsers.
<MAP NAME="site">

<AREA HREF="../../index.html" SHAPE="RECT" COORDS="5,6,95,25">
<AREA HREF="../../basics/index.php3" SHAPE="RECT" 
COORDS="61,43,109,60">
<AREA HREF="../index.php3" SHAPE="RECT" COORDS="61,65,125,83">
<AREA HREF="../../graphics/index.php3" SHAPE="RECT" 
COORDS="61,88,124,106">
<AREA HREF="../../tips/index.php3" SHAPE="RECT" 
COORDS="61,112,164,129">
<AREA HREF="../../design/index.php3" SHAPE="RECT" 
COORDS="61,133,145,152">
<AREA HREF="../../promotion/index.php3" SHAPE="RECT" 
COORDS="61,158,161,174">
<AREA HREF="../../se/index.php3" SHAPE="RECT" 
COORDS="61,180,168,199">
<AREA HREF="../../software/index.php3" SHAPE="RECT" 
COORDS="61,204,128,221">
<AREA HREF="../../services/index.php3" SHAPE="RECT" 
COORDS="61,227,158,244">
<AREA HREF="../../feedback.php3" SHAPE="RECT" 
COORDS="61,249,142,267">
<AREA HREF="../../feedback.php3" SHAPE="CIRCLE" 
COORDS="145,25,40">

</MAP>
The value of COORDS taken by RECT is the top-left corner and bottom-right, x and y coordinates. For CIRCLE, the value is x and y coordinates of the center and the radius.
The co-ordinates of the image map are specified in pixel values and you can use any graphics program to find them. Now, this procedure is quite painful and time-consuming, so I suggest you use one of the Image-Map coordinates generator programs.

HTML Forms part 3

SELECT>... </SELECT> form element

This HTML form element lets you develop a drop down scrolling list or menu. The list can allow for single as well as multiple selections.
The individual items of the list are placed with the help of another tag, <OPTION> (described below).
The attributes taken are:
  • NAME: defines a name for this element.
  • SIZE: if the size is '1', the list is displayed as a dropdown menu else as a scrolling list.
  • MULTIPLE: allows for multiple selection.
Here is how you create a four-item drop down selection list.
Which system do you use? 
<SELECT NAME="platform" SIZE="1">
<OPTION VALUE="win">Windows
<OPTION VALUE="mac">Macintosh
<OPTION VALUE="unix">Unix
<OPTION VALUE="oth">Other
</SELECT>
Which system do you use?


<OPTION> </OPTION>

The <OPTION> tag defines an item of the selection list described above. Its end tag is not required. It takes two attributes:
  • VALUE: Gives a value to the item that is sent to the server along with the selection list name.
  • SELECTED: Selects an item when the form is displayed.
Which system do you use? 
<SELECT NAME="platform" SIZE="1">
<OPTION VALUE="win">Windows
<OPTION VALUE="mac">Macintosh
<OPTION VALUE="unix" SELECTED>Unix
<OPTION VALUE="oth">Other
</SELECT>
Which system do you use?


HTML form TEXTAREA elements

This creates a multi-line text box. Its attributes are:
  • NAME: Defines a name for this element.
  • COLS: Specifies the number of character columns. Thus, a value of 20 means that the text box is twenty character in width.
  • ROWS: Determines the height of text box in terms of character rows.
  • WRAP: Sets word wrapping inside the text box and can take off, virtual or physical as value. 'Off' turns word wrapping off. Through 'virtual', word wrapping is turned on but the line endings are not transmitted to the server. 'Physical' displays and sends the line endings to the server.
To define a value for the TEXTAREA, include the text between the start and end tags.
<TEXTAREA NAME="query" COLS="20" ROWS="5">
Please type your query here.
</TEXTAREA>


<BUTTON>...</BUTTON>

This element is specific to Internet Explorer and ignored by Netscape.
It creates a button that is quite similar to ones made by <INPUT TYPE="BUTTON">. It takes the following attributes:
  • NAME: Sets a name for the button.
  • TYPE: Can take either SUBMIT, RESET or BUTTON as value.
  • VALUE: Defines the value that is sent to the server along with the button name.
<BUTTON NAME="somebut" TYPE="BUTTON" VALUE="justabut">
Just for Kicks</BUTTON>
  (Netscape users will not see the button)
Note: The text that is placed between the closing and ending tags is displayed on the button.
What do you do now?
As mentioned previously, forms are pretty useless if you don't know client-side or server side scripting. In order to gain full advantage of forms, you should learn a client-side and a server-side language.

forms in HTML part 2

This creates a button which is quite useful for triggering JavaScript events.
  • NAME: Specifies a name for the button.
  • VALUE: Determines what is written on the button.
<INPUT TYPE="BUTTON" NAME="pbut" VALUE="Push Me">

The button above does nothing when clicked. However, you can attach JavaScript event handlers to this button to set up some kind of action.
<INPUT TYPE="BUTTON" VALUE="Push me to get a greeting" 
NAME="mybut" onclick="return disp();">


The HTML form RESET button

Creates a reset button, which when clicked, clears all form elements and sets then to their default values. It has only one attribute VALUE, that specifies the text written on the button.
<INPUT TYPE="RESET" VALUE="Clear the form">


The HTML form SUBMIT button

Makes a button, which when clicked, submits the form. It has two attributes
  • VALUE: Puts text on the button.
  • NAME: Names the submit button. Its value is generally used by server side scripts to determine if the form has been submitted.
<INPUT TYPE="SUBMIT" VALUE="Send Email" NAME="semail">

Clicking on a submit button sends the name-value pairs of all form elements to the server. (Note: This submit button does not work. However, you can test one on the right to join my mailing list!)

<INPUT TYPE="FILE">

Allows your users to send files to your server. It is accompanied with a Browse button that helps the user locate the file on his computer.
Attributes taken are:
  • ACCEPT: Its value is a MIME type/s that your server program is ready to accept. A comma-separated list of mime types can be supplied.
  • NAME: Specifies a name for the element.
  • VALUE: Specifies the default text inside the text field.
<INPUT TYPE="FILE" NAME="uploadfile" VALUE="">


<INPUT TYPE="IMAGE">

This is a great tag allowing designers to make their own buttons. With its use you can replace the dull default button with a colorful image.
There are four attributes associated with this tag
  • SRC: a required attribute that points to the URL of the image file.
  • NAME: Gives a name to the element.
  • ALIGN: aligns the surrounding text with respect to the image.
  • BORDER: sets the border around the image. If zero is assigned as its value, no border is displayed.
<INPUT TYPE="IMAGE" SRC="but.gif" NAME="sub_but" BORDER="0">


<INPUT TYPE="HIDDEN">

This creates a form input field which is not displayed in the browser. It is ideal for passing values set by the programmer or by certain actions of the user.
It has only two attributes.
  • NAME: Defines a name for the element.
  • VALUE: Sets a value for the element.
<INPUT TYPE="HIDDEN" NAME="birthday" VALUE="16-03-72">

HTML Forms part 1

Note: HTML forms are not useful without a client-side scripting language or server-side technology.
The note above should be enough to prompt you in learning a programming language... but let us get down to the business at hand.
The main use of HTML forms is to gather some kind of input/feedback from visitors. This input might be in the form of comments or a shopping cart system wherein your users select items and drop them in shopping baskets. Form objects (which we shall soon meet) have also been used for various tricks by client-side programmers.
A form begins with <FORM> and ends with </FORM>. HTML presents us with various form object/elements that are placed INSIDE the form tags.
  • <INPUT TYPE="TEXT">
  • <INPUT TYPE="PASSWORD">
  • <INPUT TYPE="RADIO">
  • <INPUT TYPE="CHECKBOX">
  • <INPUT TYPE="BUTTON">
  • <INPUT TYPE="RESET">
  • <INPUT TYPE="SUBMIT">
  • <INPUT TYPE="HIDDEN">
  • <INPUT TYPE="IMAGE">
  • <INPUT TYPE="FILE">
  • <SELECT>...</SELECT>
  • <TEXTAREA>...</TEXTAREA>
  • <BUTTON>...<BUTTON>
  • <OPTION>...</OPTION>
The first ten listed above are all variants of the <INPUT> element. However, since their TYPE is different, the other attributes taken by them differ.
We shall explore these along with their attributes, one by one.

The HTML form <INPUT TYPE="TEXT">

This form object is the most common. It defines a horizontal text field as:

The attributes associated with this tag are:
  • NAME: Sets a name for this form element. You can give any name to your text field as long as you don't duplicate it in the same form.
  • SIZE: Determines the size. The value taken is a number.
  • MAXLENGTH: Specifies the number of characters a user can submit thru this element.
  • VALUE: Specifies a default value that is displayed inside the text field when a user first opens the page.
Type your first name in the box: 
<INPUT TYPE="TEXT" SIZE="15" MAXLENGTH="20" 
NAME="first_name" VALUE="Your first name">
is displayed as:
Type your first name in the box:


The HTML form <INPUT TYPE="PASSWORD">

This object is very similar to the TEXT mentioned above and takes the same attributes. Its inclusion also causes the display of a text field. However, anything typed by the user inside this text field is replaced by *s or other characters that mask what you type. Try this out yourself.
Type your password in the box:
<INPUT TYPE="PASSWORD" SIZE="15" MAXLENGTH="20" 
NAME="yourpassword" VALUE="">
Type your password in the box:

Attributes:
  • NAME: Sets a name for the password field by which it is referred using scripting languages.
  • MAXLENGTH: Sets the maximum number of characters a user can input.
  • SIZE: Takes a number as value and specifies the size.
  • VALUE: Specifies a default value.

<INPUT TYPE="CHECKBOX">

Creates a checkbox. Its other attributes are:
  • CHECKED: This attribute takes no value. Including it in the tag causes the checkbox to be checked by default.
  • NAME: Specifies a name for the element.
  • VALUE: Assigns a value to the element.
<INPUT TYPE="CHECKBOX" NAME="your_answer"
VALUE="yes" CHECKED> Do you like this site?
Do you like this site?


<INPUT TYPE="RADIO">

Makes a radio button. The attributes taken are similar to those of a checkbox (above).
  • CHECKED: Puts the radio button to "ON" state. Takes no value.
  • NAME: Assigns a name to the radio button.
  • VALUE: Specifies a value that can be passed to the server.
<INPUT TYPE="RADIO" VALUE="yes" NAME="html" 
CHECKED> Do you like HTML?
Do you like HTML?


Important: What is the difference between a radio button and a checkbox?

These two elements are not the same though they share the same attributes.
Radio buttons are employed when a single reply is desired from a list of choices. In such cases, radio buttons with the same name but different values are grouped together. Since the buttons have the same name, the user is able to select only one. The value of the selected button along with its name is sent to the server.
Checkboxes on the other hand, can be used in two ways. One to get a 'yes'/'no' kind of response and the other to get a multiple selection.
We'll see this through examples.
Do you like Mozart's Symphony No.40?<BR>
<INPUT TYPE="RADIO" NAME="moz" VALUE="yes" CHECKED> Yes<BR>
<INPUT TYPE="RADIO" NAME="moz" VALUE="No"> No<BR>
<INPUT TYPE="RADIO" NAME="moz" VALUE="notsure"> Can't Say<BR>
Do you like Mozart's Symphony No.40?
Yes
No
Can't Say
Try to select two radio buttons... you can't... that is because they have the same name. Thus, the code above presents a list of choices and expects only one selection.
Notice that the CHECKED attribute selects the first radio button when the page is first loaded. Depending on the selection, the associated value is sent to the server along with the radio button name. So, if the visitor selects Can't Say, the associated value notsure is sent along with button name, moz.

An example for checkboxes can be...
Which ice-cream flavors do you like?<BR>

<INPUT TYPE="CHECKBOX" NAME="ice" VALUE="chocolate" CHECKED>
Chocolate<BR>
<INPUT TYPE="CHECKBOX" NAME="ice" VALUE="vanilla">
Vanilla<BR>
<INPUT TYPE="CHECKBOX" NAME="ice" VALUE="strawberry">
Strawberry<BR>
<INPUT TYPE="CHECKBOX" NAME="ice" VALUE="mint">
Mint<BR>
Which ice-cream flavors do you like?
Chocolate
Vanilla
Strawberry
Mint
Notice that in this case too, all checkboxes have the same name. However, you can select multiple boxes (try it out...). This is helpful when we desire zero or more values. Values of all checkboxes that are selected are sent to the server along with checkbox name for further processing by a CGI script.
Another use of checkboxes is to get a 'yes'/'no' kind of response as in:
<INPUT TYPE="CHECKBOX" VALUE="yes" NAME="mlist">
Would you like to subscribe to our mailing list?
Would you like to subscribe to our mailing list? Although, radio buttons can be employed for the same purpose, I prefer to use checkboxes since they display a better icon.

So, radio buttons or checkboxes are used depending on the type of question you have. A generalization would be to employ radio buttons for questions where only one reply is desired and checkboxes for questions where multiple replies are possible.

Inline Frames

Inline Frames were introduced with Micorsoft Internet Explorer version 3.0. They have since been taken up by the World Wide Web Consortium and are now a part of HTML 4.0 standard. Netscape (till version 4), however, does not display inline frames so you may have to load this page in Internet Explorer to see inline frames.
The procedure for including inline frames in documents is very similar to that for images (inline frames, however, have an ending tag) and carry some of the attributes of <IMG> tag.
The tag that places an inline frame is <IFRAME>. So of its attributes are.
  • SRC: A required attribute that takes the URL of a page as value and loads it in the frame.
  • ALIGN: aligns the inline frame with respect to other elements on the page. Values taken are 'TOP', 'BOTTOM', 'MIDDLE', 'LEFT' and 'RIGHT'.
  • HEIGHT and WIDTH: Specifies the dimensions in pixels.
  • HSPACE and VSPACE: Specifies amount of horizontal and vertical space to be put around the inline frame. Value has to be a number that denotes pixels.
  • MARGINHEIGHT and MARGINWIDTH: Determines the amount of space in pixels between the left-right and top-bottom edges of the frame and its contents.
  • FRAMEBORDER: Value can be '1' which puts a 3D border around the frame or '0' which removes this border.
  • SCROLLING: A value of 'YES' forces the display of scrollbars. 'NO' removes scrollbars even if they are needed. 'AUTO' lets the browser decide on inclusion of scroll bars depending on the contents.
  • NORESIZE: Prevents users from resizing the frame.
  • NAME: Assigns a name to the frame so that it can be referred by it.
Now let us put an inline frame in this document.
Right click inside the frame to view its source.

Target attribute of anchor tag

As described in previous session, the Target attribute of <A> is most often used when dealing with frames. It specifies the window in which the document should be loaded. The TARGET attribute can take one of the six values below: (note the underscore for the first four)
  • _blank: Indicates a new window.
  • _parent: Specifies the parent frame which contains the source link.
  • _self: The meaning is very much obvious. The new document is loaded in the same frame.
  • _top: This indicates a new document window. It is a good way to break out of frames and load the document in the same window.
  • frame-name: You can use this to specify in which frame the document should be loaded.
  • RESOURCE WINDOW: This loads the document in a new browser window. This is same as _blank.
The links and their code are presented below. Click on the link to see how the TARGET attribute behaves.
<A HREF="test.html" TARGET="RESOURCE WINDOW">
Loads test.html in a new browser window</A>
Loads test.html in a new browser window

<A HREF="test.html" TARGET="_blank">
Loads test.html in a new browser window</A>
Loads test.html in a new browser window

<A HREF="test2.html" TARGET="_self">
Loads test2.html in this window</A>
Loads test2.html in this window

Frames part 6

The <FRAMESET> tag can enclose other framesets. This results in a nesting of frames. The usefulness of nested frames is much debated and seldom appreciated by purists (same guys who don't like frames in the first place).
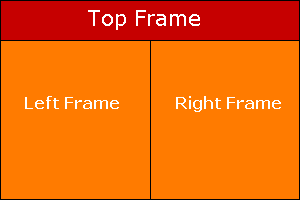
If we plan to construct our site based on the format presented in the image below, we have to make use of nested frames.
Nested Frames
And here is the code for it:
<HTML>
<HEAD><TITLE>Nested Frames</TITLE>
</HEAD>
<FRAMESET ROWS="20%, *">
   <FRAME SRC="topframe.html" NAME="top">
   <FRAMESET COLS="50%, *">
      <FRAME SRC="leftbot.html" NAME="left_bot">
      <FRAME SRC="rightbot.html" NAME="right_bot"> 
   </FRAMESET>
</FRAMESET>
<!-- Displayed in browsers whih do not support frames -->
<NOFRAMES>
There is no frame support on your browser.
</NOFRAMES>
</HTML>
The first FRAMESET divides the page into two horizontal regions, 20% and * (80%). It encloses a FRAME (topframe.html) that occupies 20% area and is displayed horizontally across the top of the page. The rest of the page area is allocated to another FRAMESET. This second FRAMESET contains two frames, leftbot.html and rightbot.html. These two frames share 50% of the remaining area.
Click here to display the file. To view source codes for individual documents (topframe.html, leftbot.html and rightbot.html), load them separately in other browser windows.
This finishes our discussions on frames (inline frames are described later), now onto the next session.

Frames part 5

The NAME attribute

The name attribute of the <FRAME> tag helps us gives names to our frames so that they can be referenced. This is especially useful for client-side scripting using JavaScript or VBScript.
To see what NAME can do for us, we shall build upon our previous examples by introducing hyperlinks and loading contents using them.
Firstly, we shall make another file frames4.html. Check out its code:
<HTML>
<HEAD><TITLE>Intelligent Frames</TITLE>
</HEAD>
<FRAMESET COLS="20%, 80%">

   <FRAME SRC="menu2.html" NAME="menuframe">
   <FRAME SRC="home.html" NAME="mainframe">
</FRAMESET>
<NOFRAMES>
There is no frame support on your browser.
</NOFRAMES>
</HTML>
Note: We load menu2.html in menuframe and home.html in mainframe.
Secondly, we modify the navigational menu frame by adding hyperlinks.
<HTML>
<HEAD><TITLE>Menu</TITLE>
</HEAD>
<BODY BGCOLOR="#FFCCFF">

<A HREF="home.html" TARGET="mainframe">Homepage</A>
<BR>
<A HREF="lions.html" TARGET="mainframe">Lions</A>
<BR>
<A HREF="tigers.html" TARGET="mainframe">Tigers</A>
<BR>
<A HREF="bears.html" TARGET="mainframe">Bears</A>
<BR>

</BODY>
</HTML>
Note the TARGET attribute in anchor tag that specifies the mainframe, the name of our right frame.
Thus, when a link is clicked on the navigational frame, the contents of the linked document will be displayed in mainframe. If we skip to add this attribute, the contents will be loaded in the same frame that carries the link.
Play with the file and understand how this works. Click here.

Frames part 4

Important attributes of <FRAME>

  • SRC: This is a required attribute and takes the URL of a document to load in the frame.
  • BORDERCOLOR: Defines color for the border. Both, color names and hexadecimal color codes are accepted values.
  • FRAMEBORDER: Places a border. Values can be '1' or 'YES' that display a border or '0' or 'NO' which prevent border display.
  • MARGINWIDTH: Defines the amount of space in pixels between the left and right hand sides of the frame and its contents.
  • MARGINHEIGHT: Defines the amount of space in pixels between the top and bottom edges of the frame and its contents.
  • NAME: Specifies a name for the frame that can be used for easy reference. This is especially helpful when using scripting languages such as JavaScript or VBScipt. We shall see its use soon.
  • NORESIZE: Frames can be sized by the user if a border is present. By placing this attribute, you can prevent your visitors from resizing frames. This attribute takes no values.
  • SCROLLING: The attributes taken are 'YES', 'NO' or 'AUTO'. A value of 'YES' will display a scroll bar eventhough one is not required. 'NO' will prevent any scroll bars and 'AUTO' lets the browser to decide if the frame needs a scroll bar.
The code below explores these attributes in more detail:
<HTML>
<HEAD><TITLE>My third framed page</TITLE>
</HEAD>
<FRAMESET COLS="20%, 80%" FRAMEBORDER="YES" BORDER="3">

   <FRAME SRC="menu.html" NOSIZE SCROLLING="YES"
   NAME="menuframe" MARGINWIDTH="0" MARGINHEIGHT="5">
   <FRAME SRC="main.html" NORESIZE SCROLLING="AUTO" 
   NAME="mainframe">

</FRAMESET>
<NOFRAMES>
There is no frame support on your browser.
</NOFRAMES>
</HTML>
We'll name this file frames3.html. You can test it by click here.
Though a border is displayed between frames you will not be able to drag it and resize the frames. This is because of NORESIZE attribute. (You can resize frames in frames.html).
The two frames now have names, the left is called menuframe while the right mainframe.
We have specified 'YES' as the value for SCROLLING attribute of menuframe, so a scroll bar is displayed.
MARGINHEIGHT attribute in menuframe puts a 5 pixel space between the top and bottom edges and the contents. MARGINHEIGHT with 0 value causes the contents of menuframe to be placed sticking to the left edge.
SCROLLING for mainframe has been set to AUTO, which places the decision of putting scroll bars on the browser. In our case, these bars are not required, hence not displayed.

Frames part 3

Important attributes of <FRAMESET>

  • BORDER: Sets the border between frames. The value determines the thickness in pixels.
  • BORDERCOLOR: Sets the color of the border. Takes color names or hexadecimal color codes as value. Applicable only if FRAMEBORDER is set.
  • FRAMEBORDER: A '1' or 'yes' value displays a border while '0' or 'no' removes the border. The BORDERCOLOR attribute work only if this attribute is set to display a border. (Note: According to World Wide Web Consortium's HTML 4.0 specification only '0' or '1' can be used as values. Though, Internet explorer accepts this, Netscape requires the values to be set either to 'yes' or 'no').
  • FRAMESPACING: Places some space between the edges of the frame and its contents. Value has to be specified in pixels and this attribute is recognized only by Internet Explorer.
  • COLS and ROWS: We've met COLS before. ROWS is similar and puts frames in horizontals rows instead of vertical columns. The values taken by these attributes can be a number (which determines the size in pixels) or percentages or wildcard *. We'll back come to this shortly.
Let's make another file which tests these attributes.
<HTML>
<HEAD><TITLE>My second framed page</TITLE>
</HEAD>
<FRAMESET ROWS="20%, 80%" FRAMEBORDER="NO" BORDER="3">

   <FRAME SRC="menu.html">
   <FRAME SRC="main.html">

</FRAMESET>
<NOFRAMES>
There is no frame support on your browser.
</NOFRAMES>
</HTML>
We'll name this file frames2.html. You can have a look at it by clicking here.
So what did you make out?
The two frames have now been displayed horizontally, courtesy the ROWS attribute. BORDER is set to '3' which makes a three pixel thick border. (The border is displayed even though FRAMEBORDER is set to 'NO'. This is because the BORDER attribute is specified).
To make the border disappear, set the values for BORDER and FRAMEBORDER to 0 and NO, respectively.

What is the wildcard "techie" term I introduced before?

If you have ever worked in a DOS window or a Unix prompt, you know what a wildcard is. For people who don't, here is the explanation.
A wildcard character matches any character or sequence of characters. So if you type DIR *.html at DOS prompt, you shall get a listing of all html files in that directory. A wildcard is not used in that sense in COLS and ROWS. Here it signifies " rest of ".
So,
COLS="200, *"
will tell the browser to allocate 200 pixels vertically for the first frame and the rest for the second frame.

Similarly,
ROWS="10%, *"
will place the first frame in 10% of horizontal space and the rest will be occupied by the second frame.
You would also have noticed that wildcards can be used with both pixel and percentage values.

Frames part 2

The important code of frames.html is presented again:
<FRAMESET COLS="20%, 80%">
   <FRAME SRC="menu.html">
   <FRAME SRC="main.html">
</FRAMESET>

Now we'll write the code for menu.html and main.html.

HTML code of menu.html page:

<HTML>
<HEAD><TITLE>Menu</TITLE>
</HEAD>
<BODY BGCOLOR="#FFCCFF">
Navigation<BR>
frame
</BODY>
</HTML>

HTML code of main.html page:

<HTML>
<HEAD><TITLE>Main</TITLE>
</HEAD>
<BODY BGCOLOR="#CCCCFF">
<H1>Main Content</H1>
</BODY>
</HTML>
These two files are quite simple and do not require much explanation.
Now, click here to view frames.html. (Note: This launches another browser window)
frames.html displays the two frames with borders. We shall soon see how to remove this. But before that, right click on the pink colored frame and select View Frame Info (in Netscape) or Properties (in Internet Explorer). You shall find that the HTML document loaded in this is menu.html. Do the same for the right frame. Here you'll find main.html.
If you have escaped all this without bruises, we'll look at some important properties of <FRAMESET> tag in the next session.

Tables part 4

A few last words about tables before we more on to frames.
Another useful table tag is <TH> which is used for adding heading to columns. It replaces the <TD> tags of the first row. The <TH> tag helps in a logical table structure assisting in overall page design. Contents of <TH> are typically rendered in bold by browsers.
<TABLE BORDER="1" CELLSPACING="0" CELLPADDING="3">
<TR>
<TH>Heading 1</TH>
<TH>Heading 2</TH>
<TH>Heading 3</TH>
</TR>
<TR>
<TD>Column 1</TD>
<TD>Column 2</TD>
<TD>Column 3</TD>
</TR>
</TABLE>
Heading 1 Heading 2 Heading 3
Column 1 Column 2 Column 3


The <CAPTION> tag provides a summary of the table's contents. It assists in a logical structure for the table. You should use this tag immediately after the <TABLE> tag.
According to HTML 4 specifications, a table should be divided into head, body and foot using the <THEAD>, <TBODY> and <TFOOT> tags. However, at the time of writing, only Internet Explorer supports these tags. The main functions of these tags is to group rows so that common alignment, styles, color etc. can be applied to them.

Tables part 3

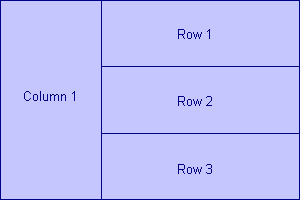
How would you design a table that looks similar to one below?
Table to create


Okay, here goes...
There are two ways to look at this. We can consider the table to consist of two columns with the second column divided into three rows OR, the other way is to understand that the first column spans three rows. HTML uses the second line of thought for laying out the table.
<TABLE BORDER="1" CELLPADDING="0" CELLSPACING="0" 
WIDTH="300" HEIGHT="200">

<TR>
<TD ALIGN="CENTER" ROWSPAN="3" WIDTH="100">Column 1</TD>
<TD ALIGN="CENTER" WIDTH="200">Row 1</TD>
</TR>

<TR>
<TD ALIGN="CENTER">Row 2</TD>
</TR>

<TR>
<TD ALIGN="CENTER">Row 3</TD>
</TR>

</TABLE>
Column 1 Row 1
Row 2
Row 3
As the code shows, The table consists of three rows. The first contains two cells while the other two have only one cell.
The first cell of the first row has ROWSPAN attribute set to 3. The ROWSPAN attribute forces this cell to span 3 rows. Get it?

Now lets look at COLSPAN
<TABLE BORDER="1" CELLPADDING="0" CELLSPACING="0" 
WIDTH="300" HEIGHT="70">

<TR>
<TD ALIGN="CENTER" COLSPAN="3"><B>Satisfying hunger?
</B></TD>
</TR>

<TR>
<TD ALIGN="CENTER" WIDTH="100" BGCOLOR="#DDFFDD"><IMG 
SRC="apple1.gif" WIDTH="32" HEIGHT="32" ALT="..."></TD>
<TD ALIGN="CENTER" WIDTH="100" BGCOLOR="#AAFFAA"><IMG 
SRC="apple2.gif" WIDTH="32" HEIGHT="32" ALT="..."></TD>
<TD ALIGN="CENTER" WIDTH="100" BGCOLOR="#00C000"><IMG 
SRC="apple3.gif" WIDTH="32" HEIGHT="32" ALT="..."></TD>
</TR>

</TABLE>
Satisfying hunger?
Full apple Bite taken Nothing left
The code shows that the table consists of two rows. The first row contains only one cell which carries COLSPAN="3" attribute. Thus, this cell will be stretched over three columns. The next row has three cells that make three columns. As an added bonus, cells of the second row have a different background color.
Actually the second row HAS to consist of three cells for the first row to span them correctly. Browsers generally will not display tables properly if there is difference between the number of columns specified in COLSPAN and the actual number of columns made via <TD> tag.

Online Workspace
Now play with the code:
To check the result, click on the "Display" button. Another browser window pops up with the results. Modify the code in the box and check the results again. Get a good feel of this before proceeding to the next section.

HTML Tables part 2

Now that you have understood the basic tags that comprise a HTML table let us look at some of their important attributes.

Attributes of <TABLE>

  • ALIGN: Takes LEFT, RIGHT or CENTER as value and aligns the table with respect to surrounding information. If the table is aligned to the right, any text or information will be aligned to the left of the table.
  • BACKGROUND: The value of this attribute has to be an image URL. This image is displayed as the background of the table. If the table is larger, the image is tiled.
  • BGCOLOR: Specifies the background color, hexadecimal color codes or color names accepted.
  • BORDER: We have already met this attribute in the previous section. It makes a border around the table. The thickness of this border depends on the number in pixels supplied as its value.
  • BORDERCOLOR: Table borders can be colored using this attribute. It takes hexadecimal color code or color name as value.
  • BORDERCOLORDARK and BORDERCOLORLIGHT: Works only with Internet Explorer. The default rendering of table borders is in 3D. If you don't want this, you can specify the same color in BORDERCOLORDARK and BORDERCOLORLIGHT attributes. For such cases, BORDERCOLOR attribute should also be used with that color value so that the table display looks similar in Netscape and Internet Explorer.
  • CELLPADDING: Its value, supplied as number of pixels, denotes the amount of space between the edge of the table and its contents.
  • CELLSPACING: This attribute sets the width in pixels between the individual table cells.
  • FRAME: Its value determines the display of a frame around the table. The default value is BORDER or BOX which indicates that the table should have a frame (This works only when the BORDER attribute has a positive value). A value of ABOVE makes a frame only at the top of the table. BELOW makes only at the bottom. HSIDES and VSIDES make horizontal and vertical edges, respectively. RHS specifies only the right edge to be displayed and LHS only the left edges.
  • HEIGHT: Specifies the table height. The value has to be in pixels. (Percentage values are supported by Internet Explorer only).
  • WIDTH: determines the table width. Its value can be in pixels and results in a fixed table size or in percentages where the table width changes depending on the size of browser window.

Attributes of <TD> Tag

  • ALIGN: Its value can be CENTER, LEFT, RIGHT or JUSTIFY, which determine how cell contents are aligned.
  • VALIGN: Aligns the contents to the TOP, MIDDLE or BOTTOM of the cell.
  • BGCOLOR: Specifies background color, hexadecimal color code or color name.
  • BORDERCOLOR, BORDERCOLORDARK and BORDERCOLORLIGHT: Determines bordercolors; the last two are specific to Internet Explorer.
  • COLSPAN and ROWSPAN: Value has to be a number. The attributes are explained along with examples in the following sections... hold on.
  • HEIGHT and WIDTH: specify dimensions in pixels.

Attributes of <TR> Tag

  • ALIGN: Its value can be CENTER, LEFT, RIGHT or JUSTIFY, which aligns the content.
  • BGCOLOR: Similar to TD, above.
  • BORDERCOLOR: Similar to TD, above.
  • BORDERCOLORDARK and BORDERCOLORLIGHT: Similar to TD, above.

Okay, enough theory, here are a few examples.
We will make a single row table with 2 cells. We shall put a background color to add spice to an otherwise drab table.
<TABLE BORDER="3" BGCOLOR="#00CC00">
<TR>
<TD>Cell 1</TD>
<TD>Cell 2</TD>
</TR>
</TABLE>
Cell 1 Cell 2
The BGCOLOR attribute in <TABLE> defines a background green color.
What if we wanted to put a different background color in these cells? For this, we use the BGCOLOR attribute of the <TD> tag.
<TABLE BORDER="3">
<TR>
<TD BGCOLOR="#FF0000">Cell 1</TD>
<TD BGCOLOR="#0000FF">Cell 2</TD>
</TR>
</TABLE>
Cell 1 Cell 2
The first cell has a red background while the second has blue. If you use a background color for the table as a whole (specified by its BGCOLOR attribute) its value will be overridden by the BGCOLOR of <TD>.
Table cell contents need not be text. They can be images and other multimedia files. Let us work on the width and border of the table and try our hands at aligning cell contents.
<TABLE WIDTH="400" BORDER="2" BORDERCOLOR="#000000" 
BORDERCOLORDARK="#000000" BORDERCOLORLIGHT="#000000">

<TR>

<TD ALIGN="LEFT"><IMG SRC="apple1.gif" WIDTH="32" 
HEIGHT="32" ALT="Full Apple"></TD>

<TD ALIGN="CENTER"><IMG SRC="apple2.gif" WIDTH="32" 
HEIGHT="32" ALT="Bite taken"></TD>

<TD ALIGN="RIGHT"><IMG SRC="apple3.gif" WIDTH="32" 
HEIGHT="32" ALT="Nothing left"></TD>

</TR>

</TABLE>
Full Apple Bite taken Nothing left


The default value for CELLSPACING is 2, if we make this as 0, our table borders look neater. Don't you think? (See below)
<TABLE WIDTH="400" BORDER="2" BORDERCOLOR="#000000"
CELLSPACING="0" BORDERCOLORDARK="#000000"
BORDERCOLORLIGHT="#000000">

--- The rest of the code same as above --

</TABLE>
Full Apple Bite taken Nothing left


BORDERCOLOR, BORDERCOLORDARK, and BORDERCOLORLIGHT are supported well only by Internet Explorer. We should not use them, if we want our pages to look similar in all browsers.
Setting the BORDER value to 0, we can create an invisible table. The table below has been centrally aligned by placing it inside a <DIV> tag (<DIV align="center">)
<DIV ALIGN="CENTER">
<TABLE WIDTH="400" BORDER="0">

<TR>

<TD ALIGN="LEFT"><IMG SRC="apple1.gif" WIDTH="32" 
HEIGHT="32" ALT="Full Apple"><BR>I'm hungry</TD>

<TD ALIGN="CENTER"><IMG SRC="apple2.gif" WIDTH="32" 
HEIGHT="32" ALT="Bite taken"><BR>Yum!</TD>

<TD ALIGN="RIGHT"><IMG SRC="apple3.gif" WIDTH="32" 
HEIGHT="32" ALT="Nothing left"><BR>Burp!</TD>

</TR>

</TABLE>
</DIV>
Full Apple
I'm hungry
Bite taken
Yum!
Nothing left
Burp!


Online Workspace
Now play with the code:
To check the result, click on the "Display" button. Another browser window pops up with the results. Modify the code in the box and check the results again. Get a good feel of this before proceeding to the next section.

Tables part 1

The <TABLE> tag was introduced for displaying content in a tabular format. However, web developers soon discovered a hidden gem. They started utilizing this tag for page layout, placing various objects in table cells to achieve a holistic page design.
There were other developers who scorned at this 'abuse of HTML tags', arguing that <TABLE> was never intended for this purpose. But the technique was taken up by designers so well and implemented so fast across web sites that it became a sort of standard method for page layout.
The cross browser compatibility of Cascading Style Sheets (whenever that happens) will provide a powerful tool for page layout and design and might degrade this unconventional use of <TABLE>.
Let us look at some examples:
The code of a very simple table is presented below along with its display in a browser:
<TABLE BORDER="1">
<TR>
<TD>Simple table</TD>
</TR>
</TABLE>
Simple table

HTML tables - Important points

  • The opening and closing table tags are <TABLE> and </TABLE>.
  • A table consists of many rows each of which begins with <TR> and ends with </TR>. The table above consists of only one row.
  • Each row can contain one or more cells. The <TD> and </TD> tags denote a table cell. The table information (text, graphics etc.) are contained inside the table cells. The above table has one one cell.
  • The contents of this table cell "Simple table" are placed inside the table cell tags.
  • So, even if you have to make only one cell, you have to write this entire code.
Now, lets increase the cell number. The table below has three cells.
<TABLE BORDER="1">
<TR>
<TD>Cell 1</TD>
<TD>Cell 2</TD>
<TD>Cell 3</TD>
</TR>
</TABLE>
Cell 1 Cell 2 Cell 3
Each cell should start with <TD> and end with </TD>. The contents of the cell are placed between these tags. The three cells themselves are placed in a single row (one pair of <TR> - </TR>).
Now, we add one more row to this table
<TABLE BORDER="1">
<TR>
<TD>Row 1, Cell 1</TD>
<TD>Row 1, Cell 2</TD>
<TD>Row 1, Cell 3</TD>
</TR>
<TR>
<TD>Row 2, Cell 1</TD>
<TD>Row 2, Cell 2</TD>
<TD>Row 2, Cell 3</TD>
</TR>
</TABLE>
Row 1, Cell 1 Row 1, Cell 2 Row 1, Cell 3
Row 2, Cell 1 Row 2, Cell 2 Row 2, Cell 3
Addition of a row requires another set of <TR> - </TR> tags.
If this is not very clear, go through it once again and then proceed to the next session.

Online Workspace
Now play with the code:
To check the result, click on the "Display" button. Another browser window pops up with the results. Modify the code in the box and check the results again. Get a good feel of this before proceeding to the next section.

Colors in HTML - web page color codes and names

Okay, here is the much awaited color session.
Colors for HTML pages can be specified by their names or hexadecimal values. The main advantage with color names is that they are easy to remember. The disadvantages are that they are not displayed equally among browsers and you are limited to only 140 colors (since there are only 140 color names!). If you want to specify colors that are browser compatible you have to use their hexadecimal values.
Internet Explorer introduced 16 color names, the rest were added by Netscape and adopted by I.E.
You can find the entire list of 140 color names along with their hexadecimal codes here.
Learning hexadecimal values is not difficult and you'll soon be able to master gremlins like #CC0099.

RGB and Hexadecimal

Colors for monitors are in expressed in RGB, Red, Green and Blue. The combinations of these colors yield other colors. The RGB values can be expressed in percentages, integer values 0-255 or hexadecimal values 00 - FF.
Since we are concerned about colors on web pages we shall concentrate on hexadecimal representation. In this notation, we use numbers 0 to 9 and alphabet A to F.
0 means no color and F means full color.
Each color in hexadecimal notation takes six digits, where the first two represent RED, the send two, GREEN and the last two BLUE color.
Let us look at some examples.
FF0000 makes red color. Here the intensity of red is highest (denoted by two Fs), while green and blue have zero values (denoted by two 0s for each color).
00FF00 makes green. Values for red and blue are specified at the minimum (two zeros for each red and blue) and green is at its maximum with two Fs.
0000FF makes blue with red and green at zero (two 00s each) and blue at maximum (two Fs).
Get the picture? Here are a few more examples to clear any doubts.
FFFF00 Red and Green in full intensity combine to make Yellow.
FF00FF Red and Blue make Pink.
00FFFF Green and Blue make Cyan.
990000 A dark shade of red. Remember that any digit below F will darken the color and digits above 0 will lighten it.
006600 Deep Green color, almost like olive green.
00CCFF This is a combination of Green (at CC) and Blue (at FF) to produce a lighter shade of blue.
999999 All colors have been expressed in almost half their intensity. This yields gray.
CCCCCC A lighter shade of Grey.
So what do you think will be the codes for Black and White?
White is made using all colors at their highest intensities and is thus, FFFFFF. Black means no color and is represented by minimizing all colors to zero values, 000000.

Using hexadecimal color notation as attribute values

When used as values for attributes, the hexadecimal color code should be prefixed by a # sign. Thus, <BODY BGCOLOR="#0000FF"> will yield a page with blue background and <FONT COLOR="#FFFF00"> will set the font color to yellow. You can use these to change the default colors for TEXT, LINK, VLINK, ALINK, BGCOLOR etc.
Experiment with various values till you get a hang of it.
Printers use another color palette called the CMYK, Cyan, Magenta, Yellow and Black (represented by K). As a rule, graphics for monitors should be in RGB and for printing should be in CMYK.

HTML color names along with their websafe color equivalents

The following is a list of HTML color names along with their corresponding hexadecimal color codes. The list also contains web safe colors that are closest to the colors displayed by HTML color names. Modern browsers are not constrained in displaying only web safe colors however, it is advisable to use a web safe color if you have the option.
Color Name Associated color code
R-G-B
Equivalent Websafe color
R-G-B
ALICEBLUE "#F0F8FF"
240-248-255
"#FFFFFF"
255 - 255 - 255
ANTIQUEWHITE "#FAEBD7"
250-235-215
"#FFFFCC"
255 - 255 - 204
AQUA "#00FFFF"
0-255-255
"#00FFFF"
0 - 255 - 255
AQUAMARINE "#7FFFD4"
127-255-212
"#66FFCC"
102 - 255 - 204
AZURE "#F0FFFF"
240-255-255
"#FFFFFF"
255 - 255 - 255
BEIGE "#F5F5DC"
245-245-220
"#FFFFCC"
255 - 255 - 204
BISQUE "#FFE4C4"
255-228-196
"#FFFFCC"
255 - 255 - 204
BLACK "#000000"
0-0-0
"#000000"
0 - 0 - 0
BLANCHEDALMOND "#FFEBCD"
255-255-205
"#FFFFCC"
255 - 255 - 204
BLUE "#0000FF"
0-0-255
"#0000FF"
0 - 0 - 255
BLUEVIOLET "#8A2BE2"
138-43-226
"#9933FF"
153 - 51 - 255
BROWN "#A52A2A"
165-42-42
"#993333"
153 - 51 - 51
BURLYWOOD "#DEB887"
222-184-135
"#CCCC99"
204 - 204 - 153
CADETBLUE "#5F9EA0"
95-158-160
"#669999"
102 - 153 - 153
CHARTREUSE "#7FFF00"
127-255-0
"#66FF00"
102 - 255 - 0
CHOCOLATE "#D2691E"
210-105-30
"#CC6633"
204 - 102 - 51
CORAL "#FF7F50"
255-127-80
"#FF6666"
255 - 102 - 102
CORNFLOWERBLUE "#6495ED"
100-149-237
"#6699FF"
102 - 153 - 255
CORNSILK "#FFF8DC"
255-248-220
"#FFFFCC"
255 - 255 - 204
CRIMSON "#DC143C"
220-20-60
"#CC0033"
204 - 0 - 51
CYAN "#00FFFF"
0-255-255
"#00FFFF"
0 - 255 - 255
DARKBLUE "#00008B"
0-0-139
"#000099"
0 - 0 - 153
DARKCYAN "#008B8B"
0-139-139
"#009999"
0 - 153 - 153
DARKGOLDENROD "#B8860B"
184-134-11
"#CC9900"
204 - 153 - 0
DARKGRAY "#A9A9A9"
169-169-169
"#999999"
153 - 153 - 153
DARKGREEN "#006400"
0-100-0
"#006600"
0 - 102 - 0
DARKKHAKI "#BDB76B"
189-183-107
"#CCCC66"
204 - 204 - 102
DARKMAGENTA "#8B008B"
139-0-139
"#990099"
153 - 0 - 153
DARKOLIVEGREEN "#556B2F"
85-107-47
"#666633"
102 - 102 - 51
DARKORANGE "#FF8C00"
255-140-0
"#FF9900"
255 - 153 - 0
DARKORCHID "#9932CC"
153-50-204
"#9933CC"
153 - 51 - 204
DARKRED "#8B0000"
139-0-0
"#990000"
153 - 0 - 0
DARKSALMON "#E9967A"
233-150-122
"#FF9966"
255 - 153 - 102
DARKSEAGREEN "#8FBC8F"
143-188-143
"#99CC99"
153 - 204 - 153
DARKSLATEBLUE "#483D8B"
72-61-139
"#333399"
51 - 51 - 153
DARKSLATEGRAY "#2F4F4F"
47-79-79
"#336666"
51 - 102 - 102
DARKTURQUOISE "#00CED1"
0-206-209
"#00CCCC"
0 - 204 - 204
DARKVIOLET "#9400D3"
148-0-211
"#9900CC"
153 - 0 - 204
DEEPPINK "#FF1493"
255-20-147
"#FF0099"
255 - 0 - 153
DEEPSKYBLUE "#00BFFF"
0-191-255
"#00CCFF"
0 - 204 - 255
DIMGRAY "#696969"
105-105-105
"#666666"
102 - 102 - 102
DODGERBLUE "#1E90FF"
30-144-255
"#3399FF"
51 - 153 - 255
FIREBRICK "#B22222"
178-34-34
"#993333"
153 - 51 - 51
FLORALWHITE "#FFFAF0"
255-250-240
"#FFFFFF"
255 - 255 - 255
FORESTGREEN "#228B22"
34-139-34
"#339933"
51 - 153 - 51
FUCHSIA "#FF00FF"
255-0-255
"#FF00FF"
255 - 0 - 255
GAINSBORO "#DCDCDC"
220-220-220
"#CCCCCC"
204 - 204 - 204
GHOSTWHITE "#F8F8FF"
248-248-255
"#FFFFFF"
255 - 255 - 255
GOLD "#FFD700"
255-215-0
"#FFCC00"
255 - 204 - 0
GOLDENROD "#DAA520"
218-165-32
"#CC9933"
204 - 153 - 51
GRAY "#BEBEBE"
128-128-128
"#999999"
153 - 153 - 153
GREEN "#008000"
0-128-0
"#009900"
0 - 153 - 0
GREENYELLOW "#ADFF2F"
173-255-47
"#99FF33"
153 - 255 - 51
HONEYDEW "#F0FFF0"
240-255-240
"#FFFFFF"
255 - 255 - 255
HOTPINK "#FF69B4"
255-105-180
"#FF66CC"
255 - 102 - 204
INDIANRED "#CD5C5C"
205-92-92
"#CC6666"
204 - 102 - 102
INDIGO "#4B0082"
75-0-130
"#330099"
51 - 0 - 153
IVORY "#FFFFF0"
255-240-240
"#FFFFFF"
255 - 255 - 255
KHAKI "#F0D58C"
240-230-140
"#FFFF99"
255 - 255 - 153
LAVENDER "#E6E6FA"
230-230-250
"#FFFFFF"
255 - 255 - 255
LAVENDERBLUSH "#FFF0F5"
255-240-245
"#FFFFFF"
255 - 255 - 255
LAWNGREEN "#7CFC00"
124-252-0
"#66FF00"
102 - 255 - 0
LEMONCHIFFON "#FFFACD"
255-250-205
"#FFFFCC"
255 - 255 - 204
LIGHTBLUE "#ADD8E6"
173-216-230
"#99CCFF"
153 - 204 - 255
LIGHTCORAL "#F08080"
240-128-128
"#FF9999"
255 - 153 - 153
LIGHTCYAN "#E0FFFF"
224-255-255
"#CCFFFF"
204 - 255 - 255
LIGHTGOLDENRODYELLOW "#FAFAD2"
250-250-210
"#FFFFCC"
255 - 255 - 204
LIGHTGREEN "#90EE90"
144-238-144
"#99FF99"
153 - 255 - 153
LIGHTGREY "#D3D3D3"
211-211-211
"#CCCCCC"
204 - 204 - 204
LIGHTPINK "#FFB6C1"
255-182-193
"#FFCCCC"
255 - 204 - 204
LIGHTSALMON "#FFA07A"
255-160-122
"#FF9966"
255 - 153 - 102
LIGHTSEAGREEN "#20B2AA"
32-178-170
"#339999"
51 - 153 - 153
LIGHTSKYBLUE "#87CEFA"
135-206-250
"#99CCFF"
153 - 204 - 255
LIGHTSLATEGRAY "#778899"
119-136-153
"#669999"
102 - 153 - 153
LIGHTSTEELBLUE "#B0C4DE"
176-196-222
"#99CCCC"
153 - 204 - 204
LIGHTYELLOW "#FFFFE0"
255-255-224
"#FFFFFF"
255 - 255 - 255
LIME "#00FF00"
0-255-0
"#00FF00"
0 - 255 - 0
LIMEGREEN "#32CD32"
50-205-50
"#33CC33"
51 - 204 - 51
LINEN "#FAF0E6"
250-240-230
"#FFFFFF"
255 - 255 - 255
MAGENTA "#FF00FF"
255-0-255
"#FF00FF"
255 - 0 - 255
MAROON "#800000"
128-0-0
"#990000"
153 - 0 - 0
MEDIUMAQUAMARINE "#66CDAA"
102-205-170
"#66CC99"
102 - 204 - 153
MEDIUMBLUE "#0000CD"
0-0-205
"#0000CC"
0 - 0 - 204
MEDIUMORCHID "#BA55D3"
186-85-211
"#CC66CC"
204 - 102 - 204
MEDIUMPURPLE "#9370DB"
147-112-219
"#9966CC"
153 - 102 - 204
MEDIUMSEAGREEN "#3CB371"
60-179-113
"#33CC66"
51 - 204 - 102
MEDIUMSLATEBLUE "#7B68EE"
123-104-238
"#6666FF"
102 - 102 - 255
MEDIUMSPRINGGREEN "#00FA9A"
0-250-154
"#00FF99"
0 - 255 - 153
MEDIUMTURQUOISE "#48D1CC"
72-209-204
"#33CCCC"
51 - 204 - 204
MEDIUMVIOLETRED "#C71585"
199-21-133
"#CC0066"
204 - 0 - 102
MIDNIGHTBLUE "#191970"
25-25-112
"#000066"
0 - 0 - 102
MINTCREAM "#F5FFFA"
245-255-250
"#FFFFFF"
255 - 255 - 255
MISTYROSE "#FFE4E1"
255-228-225
"#FFCCFF"
255 - 204 - 255
MOCCASIN "#FFE4B5"
255-228-181
"#FFCCCC"
255 - 204 - 204
NAVAJOWHITE "#FFDEAD"
255-222-173
"#FFCC99"
255 - 204 - 153
NAVY "#000080"
0-0-128
"#000099"
0 - 0 - 153
OLDLACE "#FDF5E6"
253-245-230
"#FFFFFF"
255 - 255 - 255
OLIVE "#808000"
128-128-0
"#999900"
153 - 153 - 0
OLIVEDRAB "#6B8E23"
107-142-35
"#669933"
102 - 153 - 51
ORANGE "#FFA500"
255-165-0
"#FF9900"
255 - 153 - 0
ORANGERED "#FF4500"
255-69-0
"#FF3300"
255 - 51 - 0
ORCHID "#DA70D6"
218-112-214
"#CC66CC"
204 - 102 - 204
PALEGOLDENROD "#EEE8AA"
238-232-170
"#FFFF99"
255 - 255 - 153
PALEGREEN "#98FB98"
152-251-152
"#99FF99"
153 - 255 - 153
PALETURQUOISE "#AFEEEE"
175-238-238
"#99FFFF"
153 - 255 - 255
PALEVIOLETRED "#DB7093"
219-112-147
"#CC6699"
204 - 102 - 153
PAPAYAWHIP "#FFEFD5"
255-239-213
"#FFFFCC"
255 - 255 - 204
PEACHPUFF "#FFDAB9"
255-218-185
"#FFCCCC"
255 - 204 - 204
PERU "#CD853F"
205-133-63
"#CC9933"
204 - 153 - 51
PINK "#FFC0CB"
255-192-203
"#FFCCCC"
255 - 204 - 204
PLUM "#DDA0DD"
221-160-221
"#CC99CC"
204 - 153 - 204
POWDERBLUE "#B0E0E6"
176-224-230
"#CCCCFF"
204 - 204 - 255
PURPLE "#800080"
128-0-128
"#990099"
153 - 0 - 153
RED "#FF0000"
255-0-0
"#FF0000"
255 - 0 - 0
ROSYBROWN "#BC8F8F"
188-143-143
"#CC9999"
204 - 153 - 153
ROYALBLUE "#4169E1"
65-105-225
"#3366CC"
51 - 102 - 204
SADDLEBROWN "#8B4513"
139-69-19
"#993300"
153 - 51 - 0
SALMON "#FA8072"
250-128-114
"#FF9966"
255 - 153 - 102
SANDYBROWN "#F4A460"
244-164-96
"#FF9966"
255 - 153 - 102
SEAGREEN "#2E8B57"
46-139-87
"#339966"
51 - 153 - 102
SEASHELL "#FFF5EE"
255-245-238
"#FFFFFF"
255 - 255 - 255
SIENNA "#A0522D"
160-82-45
"#996633"
153 - 102 - 51
SILVER "#C0C0C0"
192-192-192
"#CCCCCC"
204 - 204 - 204
SKYBLUE "#87CEEB"
135-206-235
"#99CCFF"
153 - 204 - 255
SLATEBLUE "#6A5ACD"
106-90-205
"#6666CC"
102 - 102 - 204
SLATEGRAY "#708090"
112-128-144
"#669999"
102 - 153 - 153
SNOW "#FFFAFA"
255-250-250
"#FFFFFF"
255 - 255 - 255
SPRINGGREEN "#00FF7F"
0-255-127
"#00FF66"
0 - 255 - 102
STEELBLUE "#4682B4"
70-130-180
"#3399CC"
51 - 153 - 204
TAN "#D2B48C"
210-180-140
"#CCCC99"
204 - 204 - 153
TEAL "#008080"
0-128-128
"#009999"
0 - 153 - 153
THISTLE "#D8BFD8"
216-191-216
"#CCCCCC"
204 - 204 - 204
TOMATO "#FF6347"
253-99-71
"#FF6633"
255 - 102 - 51
TURQUOISE "#40E0D0"
64-224-208
"#33CCCC"
51 - 204 - 204
VIOLET "#EE82EE"
238-130-238
"#FF99FF"
255 - 153 - 255
WHEAT "#F5DEB3"
245-222-179
"#FFCCCC"
255 - 204 - 204
WHITE "#FFFFFF"
255-255-255
"#FFFFFF"
255 - 255 - 255
WHITESMOKE "#F5F5F5"
245-245-245
"#FFFFFF"
255 - 255 - 255
YELLOW "#FFFF00"
255-255-0
"#FFFF00"
255 - 255 - 0
YELLOWGREEN "#9ACD32"
154-205-50
"#99CC33"

Twitter Delicious Facebook Digg Stumbleupon Favorites More

 
Powered by Blogger