Showing posts with label Fireworks Tutorial. Show all posts

Tuesday, February 22, 2011

Adobe Fireworks Shortcut Keys

1. Shortcuts for selecting and working with Fireworks Tools

v or 0 Choose the Pointer tool (black arrow). Switching tools is a common task within Macromedia Fireworks. Pressing the v key or the 0 key switches to the Pointer Tool. Pressing it again switches between the Pointer and Select Behind Tool.
a or 1 Choose the Subselector Tool (white arrow). This tool is pretty handy for selecting parts of complex elements.
t Choose the Text Tool
b Choose the Brush Tool
c Choose the Crop Tool
e Choose the Erasor Tool
g Choose the Paintbucket Tool
h Choose the Hand Tool
i Choose the Eyedropper Tool
j Choose the Polygon Hotspot Tool
k Select the Slice Tool
l Select the Lasso Tool
m Select the Marqee Tool
n Select the Line Tool
p Select the Pen Tool
q Select the Scale Tool
r Select the Blur Tool
s Select the Rubber Stamp
u Select the Rectangle Tool
w Select the Magic Wand Tool
z Magnify Tool
▲ up

2. Working With Fireworks Files using Shortcuts

strg+n Create a new Fireworks document. It directs you to the new document menu from where you can set canvas size, resolution and color. Also good to know: if you have an image in the Clipboard, Fireworks automatically pre-set the new documents dimensions
ctrl+o Opens an existing Fireworks MX document
ctrl+s Saves the current Fireworks MX document
ctrl+shift+r Export File
ctrl+shift+x Export Preview
ctrl+shift+s Save As
ctrl+r Import file
ctrl+p Print file
ctrl+q Quit Fireworks
ctrl+w Close current Window
▲ up

3. Using the Fireworks Zoom Feature with Keyboard Shortcuts

ctrl++ ahd ctrl+- Zoom in and/or out: The easiest way to change the current zoom level is to press the ctrl++ keyboard shortcut to zoom in and to press ctrl+- to zoom out again.
ctrl+0 Fit Selection
ctrl+5 50 % Magnification
ctrl+1 100 % Magnification
ctrl+2 200 % Magnification
ctrl+4 400 % Magnification
ctrl+8 800 % Magnification
ctrl+3 3200 % Magnification
ctrl+6 6400 % Magnification
ctrl+alt+0 Zoom to selection
▲ up

4. Working with Fireworks Objects

ctrl+g, ctrl+shift+g Groups and un-groups objects. For ungrouping, just add the shift key to the combination and press ctrl+shift+g
ctrl+a Selects all objects. Presssing this keyboard shortcut selects all objects on the active canvas. Easy to remember, since it is used in most applications for selecting all.
x Switch Fill and Stroke colors in color wells
f9 Show/Hide blue lines around selected objects
ctrl+shift+arrow up Bring object to front
ctrl+shift+arrow down Send object to back
ctrl+arrow up Bring object forward
ctrl+arrow down Send object backwards
ctrl+alt+1 Align objects left (when multiple objects are selected)
ctrl+alt+2 Align objects center vertical (when multiple objects are selected)
ctrl+alt+3 Align objects right (when multiple objects are selected)
ctrl+alt+4 Align objects top (when multiple objects are selected)
ctrl+alt+5 Align objects center horizontal (when multiple objects are selected)
ctrl+alt+6 Align objects bottom (when multiple objects are selected)
ctrl+shift+u Insert Hotspot
ctrl+alt+shift+c Copy Attributes from one object
ctrl+alt+shift+v Paste Attributes to another object
ctrl+alt+d Duplicate Object
▲ up

5. Image and Canvas Manipulation in Fireworks

ctrl+shift+t Numeric Transformation
ctrl+alt+t Trim Canvas
ctrl+alt+f Fit Canvas
ctrl+shift+9 Rotate Object 90 Degrees Clockwise
ctrl+shift+7 Rotate Object 90 Degrees Counter-Clockwise
▲ up

6. Ruler and Guides with Keybaord Shortcuts

ctrl+alt+r Show/Hide Ruler
ctrl+; Show/Hide Guides (if there are any guides in the document)
ctrl+shift+; Snap/ Unsnap to Guides
ctrl+alt+; Lock/ Unlock Guides
▲ up

7. Basic Fireworks Commands using Keyboard Shortcuts

ctrl+z Undo
ctrl+y Redo
ctrl+u Fireworks Preferences
f Change between Full Screen and Normal Screen
tab, f4 Show/Hide Tool Windows
ctrl+shift+f Convert object to Path
ctrl+shift+i Inverse Selection (when for example part of bitmap is selected)
▲ up

8. Working with Text in Fireworks

ctrl+shift+. Increase Text size
ctrl+shift+, Decrease Text size
ctrl+b Apply bold formatting
ctrl+i Apply italic formatting
ctrl+alt+shift+l Align Left
ctrl+alt+shift+c Align Centered Horizontally
ctrl+alt+shift+r Align Right
ctrl+alt+shift+j Align Justified
ctrl+alt+shift+s Align Stretched

Adobe Fireworks CS3 Tips

If you are a beginner you might like to go through the Fireworks CS3 Tutorial.

1. Crop an Image

You can crop a particular image within the canvas by selecting the image and [Edit > Crop Selected Image]

2. Image in Shape

You can put an image into a shape by:
  • Create a vector shape
  • Place the image over the shape
  • Cut the image
  • Click the shape
  • Select Edit > Paste Inside
  • Click the 4 dots icon that appears to move the picture around within the shape till you are stisfied with the position

3. Blend an Image into the Background

When one end of the image needs to be made transparent
  • Select the image
  • Click 'Add Mask' icon in the layers panel
  • A new green rectangle will appear in the layer
  • Click on this layer
  • Click the paint bucket tool
  • Select Gradient > Linear in the properties panel
  • Click on the image at the part that you want to remain opaque and drag till the end of the image that you want to make transparent.
  • The image will blend beautifully into the background
When the Image needs to be shaped differently
  • Select the image
  • Use the marquee tool to select the area you want to keep
  • Select > Feather
  • Specify a radius that you want to feather and click ok
  • Select > Select Inverse
  • Hit "Delete"
  • Your image will blend neatly into the background in the desired shape, if the feather is too much you can undo and repeat the process with a lower (or higher) feather radius.

4. Curve Text around a Shape

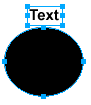
Step 1: Create some text and a shape
Curve Text
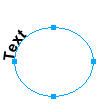
Step 2: Select both (the text and the shape) > Click Text > Attach to Path
Attach to Path
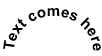
The text will curve around the shape. You can still edit the text.
Edit Text

Project: Create a Layout in

  1. If you are a beginner make sure you go through steps 1- 4 of the Fireworks CS3 Tutorial before attempting this project.
  2. Download Project Files (fireworks.zip, 1 MB)
  3. Use the images provided for the project. You can get free images like these from Dreamstime (click on the "Free images" tab).

Begin Project:

Your canvas
  1. Open a new document.
Import and edit the picture of the flowers
  1. Import Image. File > Import > Browse and select image of the flower
  2. Resize Image - Select image. Select Scale Tool. Drag the corner of the image to resize it.
  3. Rotate Image - Select Image. Select Scale Tool. Place cursor near the edge of the image > When the rotate cursor shows > click and drag clockwise or anti clockwise.
  4. Remove Background - Click the magic wand and click on the background of the image. > it will get selected > press > delete key. Select and deleate any leftover background
Menu Bar
  1. Click the rectangle tool > click and drag to create a rectangle where the menu will be
  2. Select the rectangle. select the eye dropper Tool > Click somwhere on the flower to pick that particular color
  3. Select the text tool > click on the yellow rectangle > type the menu names separated with “ | ” symbol (over enter key).
  4. Select the font and size and color from the properties panel
  5. Position the Text where desired
  6. Select the line tool > create a line below the menu rectangle
  7. Use eye dropper tool to select a green form the leaf in the image
Logo
  1. Use the text tool to create the logo name – specify font, size and colors
Image #2
  1. Insert the image of the mother and child > Resize (If too big  zoom out soo you can find the corners of the image)
  2. Select rectangle tool to create a rectangle around the image > change the stoke color to green by using the eyedropper tool
Texual Content
  1. Heading - Use the text tool to type the page heading (use a common font such as Arial so that it can be done in html later.
  2. Content - Use the text tool to type  the sample text content. If too long select tht right-center node around the text and drag inward. The text will wrap within and go downward.
Footer
  1. Copy and paste the green line below to form a boundary before the footer information.
  2. Use the text tool to type the footer text.
Slice Images
  1. Use the slice tool to create slices over the logo and the mother/ child picture. Select the mother/ child picture and change to jpeg format in the optimize panel.
  2. Export Slices -Right click on each slice and click “export selected slice”. Export the images to an “images” folder within your “project name” folder.
Your layout is ready, now you are ready to create your website. Recreate the layout in HTML with this Dreamweaver CS3 Tutorial.
In order to make you website live you will need to sign up with a hosting server. I recommend Hostgator which I use to host this site.

Slice and Export the Images

Once you are satisfied with the layout, deside which parts can be recreated within HTML and which parts will need to be exported as slices.
Text can usually be recreated in HTML except when it is using some special font that is not commonly available on all computers.
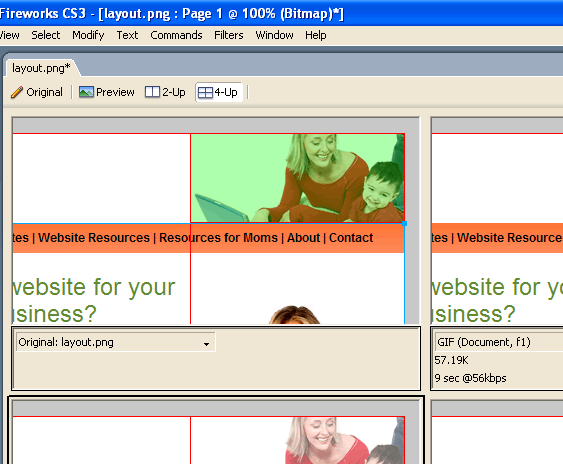
Use the slice tool to draw out areas that whille be exported as slice. Each slice will appear in the 'web layer' of your 'layers panel'. Give each slice a name which will be the file name of the exported image. If a full image needs to be converted to a slice you can also just select it, right click and select "insert rectangular slice". This can be done for mutiple objects too. The slices will apear as green objects on the page.
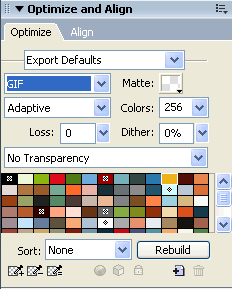
Each slice needs to be optimized to look good and yet have a low file size so that it loads quickly on the web page. This can be done from the Optimize Panel [Windows > Optimize].
optimize panel
Optimize Panel
Select each slice and optimize it in the Optimize Panel. Image with flat colors are usually better optimized as .gif files while images with many colors like photos are usually better optimized as .jpg files.
You can compare the quality and file size of different options by clicking on the Preview, 2-up or 4-up options at the top.
preview
Once you have optimized all the slices you can export them into a 'images' folder.
  • Right click each slice and export "Export Select Slice"
  • File Export > Export: Images Only > Slices: Export Slices

Create the Website Layout

nce you have put in all the images and text you can rearrange it to create a layout that will be attractive and easy to use. Ensure that the layout passes the trunk test and has the basic layout elements like logo, byline, navigation, copyright, content area, heading and sub heading styles and link styles.
Ensure your layout is something you can recreate in HTML and can be optimized to load fast.
Fonts for content should be one of the common fonts that are available on all computers. Arial or Verdana are usually easy to read on the computer. Logo fonts , button fonts and some title can use special fonts and effects but you will need to export all these as images and any change will have to be made within Fireworks and the images exported again. This is therefore more difficult to maintain, so use image text only when absolutely necessary.
Icons - Design any icons that you will use in your website.
HTML Elements - You can take a screen shot of other webpages with form fields etc. ['Prt Scr' key on your computer keyboard] and paste it into your layout to get an idea of how it will look in your layout.
Images - Resize your images and shape them to work with the rest of the elements of the layout. Check out Fireworks Tips and Tricks for additional ideas.
Flash - You can plan in space for any flash animation that you will be using, within your layout.
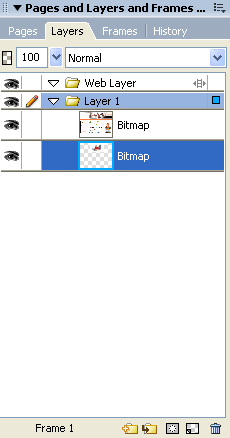
The layers panel is useful when there are many objects and you want to get to something behind. You can click on the "eye" icon to to hide a particular layer. You can move a layer over another to bring it in front.
layers panel
Layers Panel
Once you are satisfied with the layout it is time to slice and export the images that you will be using in the html page.
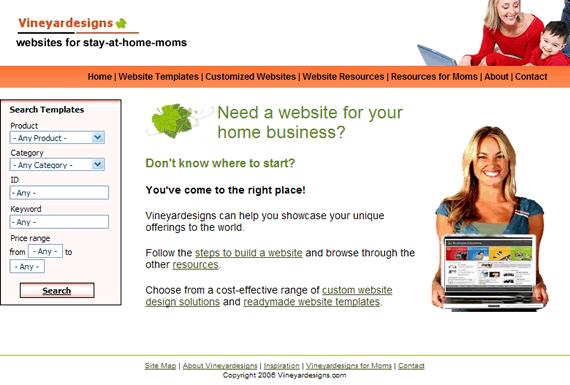
vineyardesigns layout
Sample Layout
You can also get pre-built layout designs and cusomize them. For customizable website layouts with Fireworks Source files select the category "Fireworks" in the template search below.

Insert Images and Text

If you plan to use stock photos you should find the appropriate images and keep them ready. You should also have logos, bylines and some sample text ready. If your home page has a different layout from the rest your site you will have to create 2 different layouts. For the home page design you should be clear about what you want to communicate, things that you want to highlight and other usability principles. You should also be clear on your navigation based on your site plan.

Insert Images

Insert any images that you plan to use [File > Import]
  • Browse for the image file
  • Select the file
  • Click the 'Open' button
  • The cursor will change
  • Click where you want to place the image on the canvas
  • The image will be placed there
You have many tools to clean up and enhance the image within Fireworks.
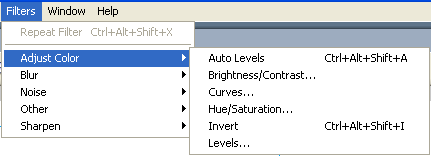
You can use auto levels to bring out the best in photos [select photo > Filter > Adjust Color > Auto Levels ].
You can also try out the other filters.
filters
Fireworks Filters
You can undo if you're not happy with it. By default you can undo upto 20 actions in Fireworks. You can increase the number of times you can undo by setting it in {Edit > Preferences > General Tab > Undo Steps].
You can make chages to the images - remove backgrounds, resize etc. You can also create vector shapes. Take some time to explore the options provided in the tools palette [Window > Tools].
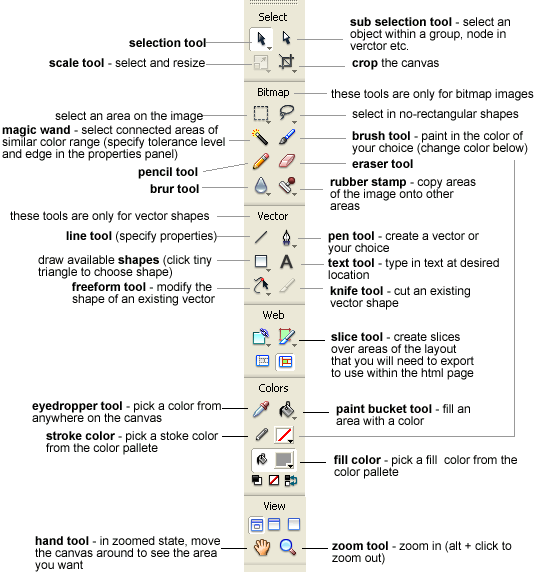
Tools Pallette
Fireworks Tools Pallette

Insert Text

Use the text tool to insert text like a sample heading, sample textual content, menu items, byline, sample links, footer - copyright info etc. Style the text by using the options in the Properties Palette.
text properties
You can specify the color, font, size etc. You can also add filters, alignments, spacing, leading etc. Explore what you can do with text.

Create a New Fireworks CS3 Document

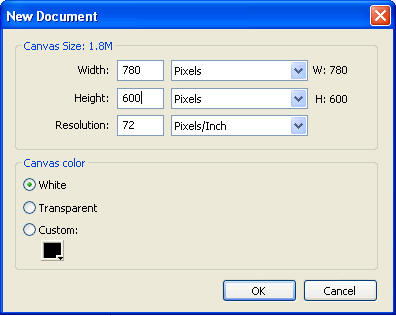
  1. Open Fireworks and create a new document [File > New].
  2. In the dialog box enter the width and height of the layout. I usually design for a width of 780 pixels width. This works well in monitors with 800 x1024 resolution as it leaves 20 pixels for the browser scroll bar. The resolution for the web is 72. You can also choose a background color if your webpage will have a background color.
  3. Click OK. new documnet
  4. Name and Save the document [File > Save]. Fireworks files have the extension .png. You can name it "layout.png".

Twitter Delicious Facebook Digg Stumbleupon Favorites More

 
Powered by Blogger