This tutorial's main focus is on the key principles that make the layout of each scene in your Director presentations visually strong. The result will be a presentation on graphic design and can be seen here.
Besides learning about graphic design and how to use the tools in Director to achieve good composition, we will also lean how about interactivity and how to write simple navigation behaviors.
You will need to download the file design.dir for this tutorial. This contains the content we will be using to create our presentation on design .
Creating Guides
1. Open design.dir and look at the cast and stage to see what exists in the movie,As you will see, I have created a number of cast members, some of them are placed in the Score.
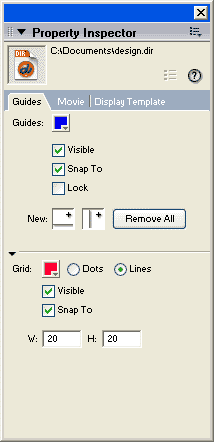 2. Click in any empty frame in the Score (one with no sprites in the channel). Now look at the Property Inspector. You will see a Guides tab (as seen to the right). This contains tools that help in layout and alignment of graphics and text on the Stage. Click on the Visible checkbox in the Guides area (upper part of the PI). Nothing happens. This is because we have no guides placed on our stage.
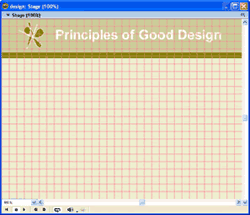
3. Click on the Visible checkbox in the Grid area (lower part of the PI).The Stage now displays a series of horizontal and vertical lines forming a grid (as seen below). The lines are spaced at 20 pixels as indicated in the W and H field boxes.
The grid view is useful for layouts which have a strict grid order to an entire screen. This is not the case for our presentation, and so is not required. Keeping it on can act as a distraction in this situation.
4. Click on the Grid Visible checkbox again to turn off the grid display.
5. Click on the Snap To checkboxes for both the Guides and Grid. Later, this will allow us to easily align (snap) our graphics to these lines.
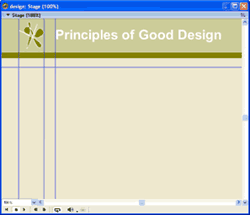
8. Click and drag the introduction text cast member from the cast window to frame 1 of the channel 6 of the Score. The text sprite should extend from frame 1 to 30. Change the end frame to frame 9.
Adding Markers
Markers are labels for the Score. They help in the organisation of your content. Markers are also very important for navigation as they identify a frame that you may jump to when a link is clicked. We will use markers in interactivity later. For now, we will use markers for organisation of content.10. In the Marker channel (white row at the top of the score), click in frame 10. A marker is created with the default name of New Marker
A marker can be moved by simply dragging the rectangle left or right to another frame. A marker can be deleted by dragging it up or down out of the channel and then releasing the mouse button.
11. Add markers at frames 1, 10, 20, 30 and 40 with the names introduction, alignment, contrast and balance respectively, with the result as below.
12. Click and drag Proximity text from the cast window to frame 10 in channel 6 of the Score. you will see that this time, instead of a sprite of 30 frames, the end point of the sprite is restricted to frame 19, one before the marker.
13. Drag Alignment text, Contrast text and Balance text to frames 20, 30 and 40 respectively.
14. Click on the Balance text, then Shift and click the Introduction text to select all the sprites in channel 6. Change the ink to Background Transparent.
Using the Align Tool
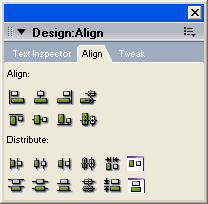 15. Choose Window > Align.
16. Choose Align left edge
18. Change the ink effect of the sprite to Background Transparent.
19. Use the guides to try align this sprite to the middle of the logo. You will find that you can snap to the horizontal line but there is no way to snap to the middle of the two intersection points. You will also notice that even though we can align the text member to the horizontal guide, the top edge of the text does not quite match to the top of the main text sprite. This is because the Line Spacing formatting in the text.
20. Double click on the the navigation bar text in the cast window to open it in the text editor. You will notice the Line Spacing is 18
21. You will also notice the text is centre aligned
22. Click on the navigation bar text sprite on the stage and use the arrow keys to move the sprite and align it to the guides. Make the top edge aligned to the horizontal guide and the right edge aligned to the 113 vertical guide.
In the steps so far, we have used tools to align visual elements, creating visual relationships between them. Alignment is one of the key principles in good graphic design. Our layout looks more ordered and aesthetically stronger because of it.
Proximity is another key graphic design principle. If we look at our layout in frame 1, we have a grouping of common elements with the right enough of space to show the relationships between content. The navigation bar text that we formatted has each line with enough space between them, but still close enough so each line appears related. The space we leave between each shows how they are related.
Contrast is the next important criteria. Without it, everything would look the same and would therefore be very dull. Contrast helps distinguish the hierarchy of information on the page. It is important to have clear levels of importance of information on a page to help the readability of the page. The main heading is bigger in font size and is placed at the top to make it the most important. The subheading is bigger in size and different in colour to make it the next level of importance and distinguish it from the main body text.
23. In the introduction text member, format the words The Non-Designer's Design Book in bold italic, and the words contrast, repetition, alignment and proximity at the end of the first paragraph in bold. Also make balance at the end of the second paragraph bold, and hierarchy of information in the third paragraph. Note how the words stand out using text weight for contrast.
24. In the Balance text member, make the words Symmetrical balance, Asymmetrical balance and Radial balance bold and a RGB colour of 147, 121, 0 (same as subtitle).
Adding Interactivity
Now we have laid out each scene of our presentation, we are ready to add interactivity. Any visual element can be made into a link simply by attaching a behavior (script) to the sprite. In our case, the navigation text is a single cast member which poses the following problem - if we attach a behavior to this sprite, it will react in the same way whether we click introduction or balance. We could have kept each word a separate cast member and a separate sprite. This would have made adding interactivity easier, but would have taken more time to organise the spacing of the text on the Stage. So, what we will now do is create invisible buttons on top of the text.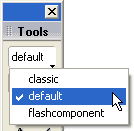 25. Make sure the Tool Palette is open Window > Tool Palette. At the top of the Tool Palette you will see the view that is open. The Tool Palette can have three views, classic, default and flashcomponent. Some tools appear on every view, but others appear on a a specific one. The tool we need can be found on either classic or default, so choose one of theses views.
27. In the Score, click on frame 1 in channel 23.
28. Click on the Rectangle button
29. Click and draw a rectangle around the word introduction on the stage
30. Extend sprite 23 to frame 49.
31. Copy and paste sprite 23 to channels 24 to 27.
32. Move and resize sprites 24 to 27 so they form boxes around each line of text in the navigation bar.
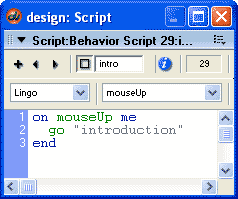 33. Right click (Windows) or Control click (Mac) on sprite 23 and choose Script from the pop-up menu. This opens the Script window and creates a behavior that will be attached to the sprite. Name the script intro as shown.
 As you will notice, the first line (on mouseUp me) and the last line (end) is written for you. The first line is the event on which Director will execute the set of instructions that follow. It is also referred to as a handler or event handler. The default event handler for sprite behaviors is mouseUp, which represents when the mouse button is released.
This line of code (called a statement) is an instruction telling Director that when this sprite is clicked and the mouse button is released, the playback head should jump to the introduction marker. We could tell Director to jump to a specific frame number, but this is not a good idea as it can cause problems later on. With Director, we can add or remove frames from the score and so scripts that refer to specific frame numbers can become incorrect.
We now have a complete script. This script is called a sprite behavior. It makes the sprite behave in a certain way. The script we wrote is in Lingo, one of Director's two internal programming languages. Lingo was written to make programming easy for non-programmers. With Director becoming more sophisticated and programmers forming a large proportion of the user base, Macromedia decided to add a new programming language called JavaScript Syntax (Director MX 2004). If you are familiar with JavaScript or ECMA code, then you may find this language is to pick up. JavaScript Syntax is not exactly the same as JavaScript, but the syntax (the way you write the code) is similar.
JavaScript Syntax was added to Director to allow more flexibility in coding and to help programmers familiar with other ECMA based languages to quickly cross over to Director. It was not added to replace Lingo. So, now there are two languages and it's up to you to decide which you like the best. Next we will create a JavaScript Syntax script.
35. Select sprite 24 and then choose Modify > Sprite > Script. The script window opens as before.
36. Click on the word Lingo and from the pop-up menu, choose JavaScript
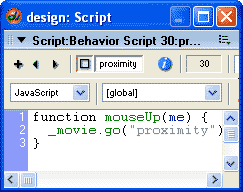 37. Close the Script window and then reopen it. It now opens with the first and last line written in JavaScript Syntax.
38. Name the script proximity.
39. In line 2, add the statement:
_movie.go("proximity")
The statement above will do exactly the same as
go "proximity". However, we could not mix Lingo and JavaScript Syntax code in a single script.
You may wonder why there are different syntaxes of the same command in a single language. When Macromedia first developed Lingo, it was primarily a language for non-programmers and the syntax used was called verbose syntax. This is an English sentence way of writing statements. With Director 7, dot syntax was introduced. Dot syntax allows you to use dots and brackets instead of words and makes the writing of code quicker. However, it is less English-like and so less friendly to some. With Director MX 2004's introduction of JavaScript Syntax, Macromedia have dropped the focus on verbose syntax, and while it still works, it is not covered in the Director documentation.
40. Create behaviors for sprites 25, 26 and 27, using the programming language you're most comfortable with. Remember, if you want to change the language back to Lingo, you will need to change the language in the script window as we did in step 35.
We now have links to the different parts of the movie but we need to create a pause to hold the playback head at each scene.
41. Double click frame 1 of the scripting channel. The script window opens, this time with a frame event handler. If the last script you wrote was in JavaScript syntax, the window will display function exitFrame(me) { as the first line. Change the language back to Lingo if this is not the case.
I prefer Lingo, and so will be using it for the rest of this tutorial.
42. Create a frame behavior in frame 1 with the following code:
on exitFrame me
go the frame
end
The above script tells Director that when it is about to leave (exit) the frame, it should go back to the same frame. So, we are telling to keep playing the same frame and thereby pausing in that frame. if we had any time-based media like sound or video in this frame, they will continue to play.
For those of you who like JavaScript syntax, you use _movie.go(_movie.frame) to replace
go the frame
43. Copy and paste the pause from frame 1 to frames, 10, 19, 20, 29, 30, 39 and 40.
The reason I have a pause at the start and end of each marked segment is because I have an animation that follows, which you will see later.
Note, it important to not rewrite the pause script for each frame as that would mean duplicating cast members unnecessarily. You can also place the pause behavior into the script channel by dragging and dropping the pause cast member from the cast window to the relevant frame in the scripting channel,
44. Click on frame 10 in channel 9. This is the business card background.
45. Open the script window and create a script with the following code:
on mouseUp me
go the frame + 1
end
We have used a similar statement to our pause with the addition of '+ 1'. This statements tells Director to go to the next frame - the current frame plus 1.
46. In the script window name the cast go next frame.
47. Drag and drop go next frame onto sprite 9 in frames 20 and 30.
48. Select all the invisible button sprites (channels 23 to 27).
49. Open the Library palette, click on the Library List button
50. Drag the Rollover Cursor Change icon
The presentation is now complete. Play the movie clicking on all the links. You will see the business card animate to help further explain the concepts we have talked about. You can find the finished file here: design_fin.dir
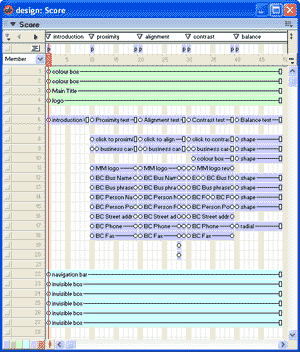 One last thing before we finish off. Look at the Score (shown to the right). Notice how I have used the principle of proximity to organise and separate common elements in the sprite channels. Keeping a good organisation of your score is important yourself and particularly in team work to allow everyone to clearly identify where everything is.
 To further define the related sprites, you can change the colour of them using the colour chips in the bottom left corner of the Score. the results is shown below. notice, all my cast members are named to further help in management and organisation of content.


 2:21 PM
 Unknown
0 comments:
Post a Comment