Publishing Director Executables
Director movies are cross platform. You can take a DIR file made with a Windows Director and open it with Director on the Macintosh. Projectors however, are platform specific. Projectors are self executables that allow you to run your movies without the need for Director or any other software to be installed on the computer. With earlier versions of Director, you were required to create a Mac specific projector with a Macintosh Director and a Windows specific projector with a Windows Director. Director MX 2004 allows you to create both platform projectors from one version of the software.This tutorial will show you how to create a fast start stub projector for both platforms with Director MX 2004 on Windows. While you will see that this process can allow cross platform development without ever going to a Mac, there are a number of issues you will need to consider. We will cover some of these issues as we move through the tutorial. One issue I will mention now is it is always a good idea to move files between the different operating systems if you intend your application to run on both. Testing for any differences in the way that your files look and play will help you to avoid any potential problems.
What is a stub projector?
In the most simple terms, a stub projector is a small, start-up file that launches the main application stored in one or more separate Director movies. The stub projector has minimal content. It sets up the way your application will look (such as playing in a window or full screen) and stores all the executable information. By minimising your application content in the stub, your executable remains small in file size and so starts much faster.Developing an application as a series of small, interlinked movies with a fast start stub projector is much better from a memory management point of view, over creating a single large file that stores everything. It will result in more efficient and smoother playback of your application.
Creating the stub movie
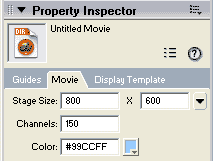
1. Start a new movie: File > New > Movie (Shortcut = Ctrl+N) 2. Click on the stage, then click on the Movie tab in the Property Inspector. Change the Stage size to 800 x 600.
We will be creating a full-screen application. For general purpose CD-ROM applications, 800 x 600 is a standard size used today. A few years ago, 640 x 480 was the standard. While, both larger and smaller stage sizes are used, 800 x 600 is a good size to choose if you want to ensure your application runs on a range of computer configurations.
4. In frame one of your score, place the following into the scripting channel:
on exitFrame me
go movie "main"
end
We are assuming that main.dir is the 'main' part of the application (or at least the starting file). We do not put the DIR file extension because we can protect the main.dir movie which will then become main.dxr. A protected movie is one that cannot be opened in Director and therefore is 'safe' to distribute without giving away the code you have developed for your application.
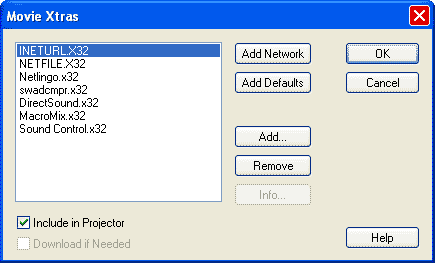
5. Go to Modify > Movie > Xtras. In the dialog box that appears, click on INETURL.X32, as shown below, then click the Remove button. Continue clicking the Remove button until all the items have been removed.

Xtras are Director's plugins. There are standard Xtras that come with Director and provide information of how media types will work. If, for example, you have a Flash movie in your application, you will need the Flash Xtra (also called Asset) to be bundled with the projector to give information on how the Flash members will be displayed and work. Xtras can either be embeded in the projector (as indicated above with the tick next to Include in Projector) or they can be bundled as external files. Generally, it is a good idea to keep the Xtras as external files. This will allow the projector to remain as small in file size as possible and ensure it is fast when starting up.
If Xtras are not bundled with the projector, you may receive an error message telling you the Xtra is missing. Sound will not play without the required Xtras and visual media may appear with a red box with an X through it.
6. Save your movie as stub.dir.
We have now saved a movie that can act as a stub for the main application.
Creating the 'mock' main application file
1. With stub.dir still open, choose File > Save As, and save the movie as main.dir.2. Change your script in frame 1 to
on exitFrame me
go the frame
end
3. Create a text member with the words "This is the main movie" and place it in your Score in frame one.
4. Save the movie.
5. Go to Modify > Movie > Xtras
You will notice that 3 new Xtras have been added to the movie,
TextAsset.x32
TextXtra.x32
FontXtra.X32
These Xtras are important for the text to be displayed properly. Whenever you add a new cast member that is linked to a specific Xtras, those Xtras will automatically be added to the movie's Xtra list. In our case, this will not affect our stub projector in any way since it will be made rom a different movie.
Projector publishing
1. Open stub.dir.2. Go to File > Publish Settings...
The top option is your Windows projector (simply referred to as Projector). Make sure it is ticked
The second option is a Macintosh Projector. With the Windows version of Director MX 2004, you can create a Mac projector for OSX only. If you want to create a OS 9 Mac projector, you will have to use a Macintosh Director.

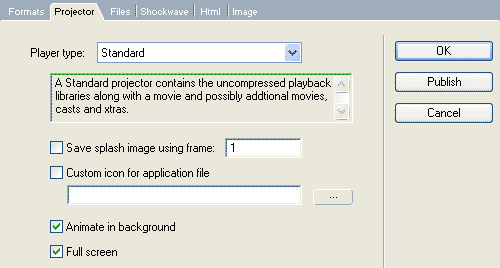
3. Click on the Projector tab.

The default setting for Player type is Standard. Choosing Shockwave removes some of runtime library files from the executable, further reducing the projector size. Select Standard. for now.
4. Click on the Full screen and Center stage in monitor check boxes.
Another option that you can set at this stage is the Exit lock property. Ticking this box will prevent users from exiting the projector by pressing the Escape key or Control + Q. We will leave it unchecked.
5. Click on the Files tab.

You will see an option Exclude all Xtras. This does the same thing as we did earlier by removing Xtras from the Xtra list. However, selecting the checkbox here is much faster, so is probably the better way to go. But, now you know both ways.
In this Files tab, we can add other movies or cast files to be included in the projector. But, that would defeat the purpose of keeping them separate and keeping our projector optimised to be a fast start stub.
The Compress files (Shockwave format) allows cast content to be compressed with shockwave, but this is not needed.
The options at the bottom, Play every movie in list is only important if we include more than one movie in the projector, which is not advisable in any situation.
6. Click on the Publish button. You will be prompted to save your movie which you should do.
The projector will then open but you will get an error message as follows
This application requires an Xtra (Text) that either does not exist or failed to initialize properly. Please make sure the appropriate Xtras are in the Xtras folder(s).
7. Click OK.
You will see the red box with the X through as I mentioned earlier. Since we have not embedded the Text Xtra into the projector and we have not bundled it as an external file, the text cannot be displayed.
8. Close the projector by pressing Escape or clicking the close box
9. Open the projector settings dialog box, click on the Projector tab, change the Player type to Shockwave and click Publish.
This time the projector may play with no errors and the text appears as it should. The reason it would work in this case is because the projector is using Shockwave to play the projector. If you have Shockwave installed on your computer, as I do, the required files are found without any problems. However, you can't assume everyone will have Shockwave on their computer. Later on, we will bundle all the correct files to eliminate the need for Shockwave.
NOTE: Educational versions of Director are unable to create Shockwave projectors. Creating a Shockwave projector with such a version will simply create a standard projector.
One other thing that you may have noticed when the projector was launched was that it opened in a window even though we had chosen to create a Full Screen projector . We will now see how to control the appearance of a projector.
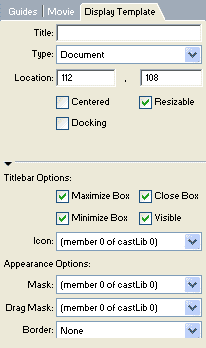
 Open stub.dir, click on the Stage, then click on the Display Template tab in the Property Inspector.
 General Options
Title allows you to specify the text in the titlebar of the projector window. When no title is specified in the Property Inspector, the window title will be the same as the projector name.
Change the Title to My Stub Projector, save and then publish the projector. You will see the title change to your text.
Type allows you to specify a window type.
Document windows appear with a standard titlebar, a close box, and a minimise and maximse box.
Tool windows appear with a short titlebar and a small close box. They appear on top of document windows (if multiple windows are open).
Dialog windows have a standard titlebar and a close box. Dialog windows are always on top of other window types.
Location allows you to specify the position of the window on your monitor.
Generally, a projector window should be centred. As you can see, the default setting does not have Centered selected but we specified this in the publish settings, which took priority.
Publish the movie again with Resizable checked and when the projector opens, click and drag the edge of the window. Resizeable allows you to resize a projector window while it is running. Docking is only important for creating a Movies In A Window that you will use while authoring and want to be able to docked in the Director UI.
Titlebar Options
The Titlebar Options allow you to specify what icons appear in the titlebar. These include the Maximize Box
Experiment with the above settings to see how they affect the projector window.
Icon allows you determine the icon that appears in the title bar based on a selected a cast member.
Appearance Options
Mask allows you to assign a bitmap cast member to act as a mask for the window.
Drag Mask allows you to use a bitmap cast member as a mask to determine which areas of the window a user can click on to move the window.
Border allows you to set the create a window without any border (None) or a 1 pixel black border (Line).
Experiment with the None and Line border options. You will only notice the Line border if your monitor is larger than 800 x 600.
If you look at the Property Inspector in List View mode, you will see further options. This includes properties only available on Macintosh:
Side Titlebar determines whether the title bar appears on the left side of the window.
Drop Shadow creates a shadow around the window. Most Mac windows have it turned on.
Metal gives a metal or ice appearance to a window
Live Resize specifies if the window contents and the size of the window will update while the user is dragging to resize the window.
For our stub, we will not be using a titlebar, so uncheck the Visible option and choose a None border. Publish the movie and then close Director.
Bundling the Xtras
1. Open Windows Explorer and find the folder where you saved your stub.dir. In this folder, create a new subfolder called ApplicationSetUp. Move the stub.dir, main.dir and stub.exe into this folder.2. Navigate to C:\Program Files\Macromedia\Director MX 2004\Configuration
I'm assuming Director is installed on your C drive. The path structure should be the same regardless of the drive letter.
In this Configuration folder you will see a subfolder called Xtras. Copy and paste this folder into your ApplicationSetUp folder.
This Xtras folder you copied contains all the standard Xtras that come with Director and any that may have been installed at a later stage. For our application, we don't need all the Xtras. To find out which Xtras you need you would have to go to each movie and choose Modify > Movie > Xtras . Since this is a painfully slow process, the better approach is simply to go through the Xtras folder and identify which Xtras you remember using in your application. With experience, you will be able to quickly identify the 'right' and 'wrong' ones. If you include Xtras that your movie does not use, the movie will be unaffected and the only issue will be that you have more files and larger disk space than required. If you don't include the required Xtras, well, you have seen what can happen.
Some Xtras, known as Tool Xtras are only used when authoring and have no affect when running a projector. So, you can delete the Tool folder under the Xtra.
Xtras are platform specific. If you're creating a cross platform application, you will need the Xtra file specific to that platform type. Projectors will find Xtra files no matter how deep they are located in the Xtras folder and regardless of any subfolder names. So, here's how you can set up your folder structure for cross platform delivery:
ApplicationSetUp
Xtras
Win
All Windows X32 files here
Mac
All Mac Xtra files here
3. Go back to C:\Program Files\Macromedia\Director MX 2004\
Copy the Director application resource files to the ApplicationSetUp. These files can be either placed in the same folder as the projector, or can be inside the Xtras folder.
The files to be copied are as follows:
| Windows | Macintosh |
| dirapi.dll iml32.dll proj.dll msvcrt.dll | DPLLib IMLLib ProjLib MacromediaRuntimeLib |
The one thing we could change is we could add a startup graphic to our stub.dir. At the moment it opens a blank screen before the text of main.dir appears, which creates a flash before the main application opens. To avoid this, you could include a graphic to allow the application to open more smoothly to your eye.


 2:28 PM
 Unknown
0 comments:
Post a Comment