The RPC over HTTP protocol allows your full Outlook 2003 MAPI clients to connect to Exchange 2003 Servers using HTTP/HTTPS. This solves the problem remote Outlook 2003 users have when located behind restrictive firewalls. The trick is to figure out how to properly configure the Outlook 2003 client to use this protocol. If you have remote users who need to access Exchange 2003 via Outlook 2003, then check out this article and see how to configure Outlook 2003 to use RPC over HTTP.
Internet connected organizations are coming to the realization that firewalls are useful for more than just inbound access control. The traditional way of thinking about firewalls is that they protect you from intruders located outside the firewall. Today’s firewall administrator realizes that the corporate firewall must not only control what comes into the network, but also what leaves the network. Many of us learned this lesson the hard way after having our networks infected with the
Nachi virus.
Unfortunately, many firewall administrators go too far. In their attempts at controlling outbound access, they end up preventing outbound access to all protocols except for HTTP or SSL secured HTTP (HTTPS). This prevents remote users from accessing your Exchange Server using secure Outlook RPC connections via ISA Server 2000 Secure Exchange RPC publishing. Blocking secure RPC connections prevents your remote users from benefiting from the full Outlook MAPI client.
Microsoft realized the magnitude of this problem. Their solution is the RPC over HTTP protocol. This protocol allows remote Outlook 2003 clients to connect to Exchange 2003 Servers using HTTP or HTTPS. The RPC protocol commands and data are "wrapped" (as known as
encapsulated) in an HTTP header. The firewall in front of the Outlook 2003 MAPI client only sees the HTTP header and passes the outbound connection through. The RPC over HTTP protocols allows your remote users to get around what might be considered an overly zealous approach to outbound access control.
The Outlook 2003 client connects to an RPC over HTTP proxy server. The RPC over HTTP proxy server can be a front-end Exchange Server running IIS 6.0 on Windows Server 2003, or the RPC over HTTP proxy server can be a machine running the IIS 6.0 RPC over HTTP proxy service on a machine that is not configured as a front-end Exchange Server.
Microsoft’s documentation stresses the front-end/back-end Exchange configuration, but this configuration is
not required. The Outlook 2003 client only needs to connect to a Windows Server 2003 machine configured as a RPC over HTTP proxy.
An example of such a configuration is shown in the figure below.
here are many ways you can make the RPC over HTTP proxy available to remote users. The most secure way, and the only way I recommend that you do so, is to use an ISA Server 2000 firewall to control inbound access to the RPC over HTTP proxy. The ISA Server 2000 firewall is able to inspect even SSL encrypted packets for dangerous exploits that might be hidden inside the SSL tunnel. Other firewalls are not able to evaluate the validity of the commands and data moving from a remote client to the RPC over HTTP proxy and put your network and Exchange Servers at unnecessary risk.
For more information on how to configure an ISA Server 2000 firewall to support secure inbound RPC over HTTP connections, check out the following series of articles:
Part 1 of this series can be found at:
http://www.msexchange.org/articles/rpchttppart1.html
Part 2 of this series can be found at:
http://isaserver.org/articles/rpchttppart2.html
Part 3 of this series can be found at:
http://www.isaserver.org/tutorials/rpchttppart3.html
Part 4 of this series can be found at:
http://isaserver.org/tutorials/rpchttppart4.html
You must use Outlook 2003 running on Windows XP Service Pack 1 to connect using the RPC over HTTP protocol. In addition, you must install the hotfix mentioned in Microsoft KB article
Outlook 11 Performs Slowly or Stops Responding When Connected to Exchange Server 2003 Through HTTP. Download and install the hotfix before configuring a profile that allows the user to connect to the Exchange Server.
It is important to note that you must create the Outlook 2003 profile while the Outlook 2003 computer is on the internal network, or while the Outlook 2003 computer is on the Internet and can access the Exchange Server using RPC (TCP 135 – typically through an ISA Server 2000 secure Exchange RPC Publishing rule).
You will not be able to create a new profile or change an existing profile to use RPC over HTTP if is does not have access to the Exchange Server via RPC (TCP 135).
This bears repeating: you will not be able to create a new Outlook profile when the Outlook client is not on the internal network and can access the Exchange Server using RPC via TCP 135. In addition, a user with an existing profile will not be able to alter the existing profile so that it can use RPC over HTTP
if that client is not located on the internal network and can access the Exchange Server using TCP 135. The Outlook 2003 profile must be configured to use RPC over HTTP while that machine is connected to the internal network and can access the Exchange Server via TCP port 135.
Of course, there are always exceptions to the rule. The article
Configuring Outlook 2003 for RPC over HTTP indicates that you should be able to use the Office Resource Kit to configure an Outlook 2003 profile that allows access to the RPC over HTTP severs
without requiring RPC access to the Exchange Server. We have not tested this configuration. If you have used the ORK to configure such a profile, please let us know about your experiences on the message board at
http://forums.isaserver.org/ultimatebb.cgi?ubb=get_topic;f=5;t=002315.
Configuring the Outlook 2003 RPC over HTTP Client
Perform the following steps to create the Outlook 2003 profile:
- Click Start and then right click on the Outlook 2003 icon in the menu. Click on the Properties command.
- Click the Add button in the Mail dialog box.
3. Type in a name for the profile in the
Profile Name text box. Click
OK.
4. Select the
Add a new e-mail account option in the
This wizard will allow you to change the e-mail accounts the direction that Outlook uses page. Click
Next.
5. On the
Server Type page, select the
Microsoft Exchange Server option and click
Next.
- On the Exchange Server Settings page, type in the FQDN of the front-end Exchange Server. This must be the same name used on the Web site certificate you have assigned to the front-end Exchange Server’s Web site. For example, we obtained a Web site certificate for the front-end Exchange Server’s Web site. The Common Name (CN) on the Web site certificate is owa.internal.net. Therefore we enter owa.internal.net in the Microsoft Exchange Server text box.
Type a user account name in the User Name text box. Click the Check Name button to confirm that the Outlook 2003 client machine can communicate with the front-end Exchange Server.
Put a checkmark in the Use local copy of Mailbox checkbox.
Click the More Settings button.
7.You can change how Outlook detects the connection state on the
General tab of the
Microsoft Exchange Server dialog box. Do not make any changes here unless you have an explicit reason to do so.
8. Click on the
Advanced tab. Confirm that there is a checkmark in the
Use local copy of Mailbox checkbox. The default selection is
Download headers followed by full item.
9. Click on the
Security tab. Put a checkmark in the
Encrypt information checkbox. I’m not sure this does anything when you use RPC over HTTP, but encryption is a good thing, so we’ll enable this checkbox anyhow.
10. Click on the Connection tab. Select the Connect using my Local Area Network (LAN) option. Put a checkmark in the Connect to my Exchange mailbox using HTTP, then click the Exchange Proxy Settings button.

- You configure the specifics of the RPC over HTTP session in the Exchange Proxy Settings dialog box. Type in the FQDN to your front-end Exchange Server in the Use this URL to connect to my proxy server for Exchange text box. This is same name listed as the Common Name on the Web site certificate.
Put a checkmark in the Mutually authenticate the session when connecting with SSL checkbox. Put in the FQDN of the front-end Exchange Server (the same name listed on the Web site certificate) in the Principal name for proxy server text box. Use the format:
Msstd:FQDN For example, we use msstd:owa.internal.net for our published front-end Exchange Server because the Common Name on the certificate is owa.internal.net.
Put a checkmark in the Connect using HTTP first, then connect using my Local Area Network (LAN). This is an interesting setting, as its unclear what a "LAN" protocol is in contrast to an "HTTP" protocol. I assume it means to use unencapsulated RPC messages, but I can’t say that for sure.
In the Use this authentication when connecting to my proxy server for Exchange drop down box, select the Basic Authentication option. This forces you to use SSL, which is OK, because we are using SSL for our links.
Click OK on the Exchange Proxy Settings dialog box.
12. Click
Apply and
OK on the
Microsoft Exchange Server dialog box.
13. Click
Next on the
Exchange Server Settings page.
14. Click
Finish on the
Congratulations! Page.
- Click OK on the Mail dialog box.
16. Open
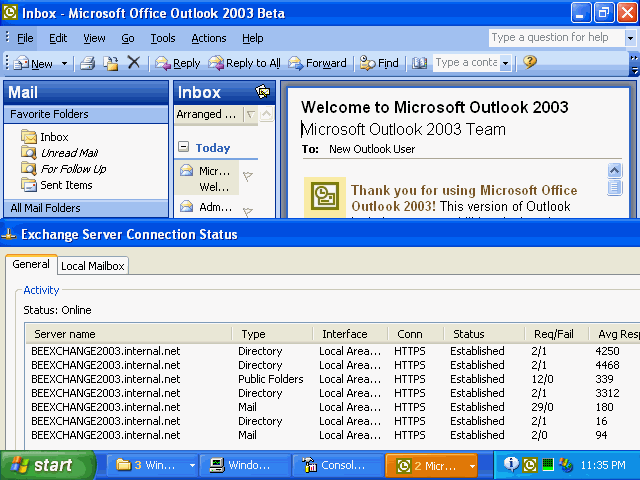
Outlook 2003. You will be able to use HTTPS for the connection, as confirm in the
Exchange Server Connection Status window. You can access the connection status window by right clicking on the Outlook 2003 icon in the system tray and selecting the connection status command right after you start up Outlook 2003.


 5:46 PM
 Unknown